
Google Analytics 4 (GA4), previously named Universal Analytics (UA), provides flexibility in the way you track and collect data on your website or in your mobile app. It gives you insight into how your audience uses your online property and provides reporting tools to view that data. It is typically used when designing marketing strategies or for search engine optimization (SEO). You can also see which content is performing well or what is selling the best if you are running an e-commerce store.
Universal Analytics is becoming Google Analytics 4
Google Analytics 4 is scheduled to replace Universal Analytics (GA 3) by July 1st, 2023. After this date, you won't be able to process new data in UA, but you will be able to access your historical data for six months. This step-by-step guide on how to set up Google Analytics focuses on GA4 while providing information on how to set up UA alongside it.
If you track your website data with Universal Analytics, track it in parallel with your Google Analytics 4 property. This way, you can use your existing reports with all their historical data, and you can use the new reports in Google Analytics 4 at the same time.
You may want to learn more about the difference between Google Analytics 4 and Universal Analytics before getting started. Still, tracking metrics like your page views, demographics, referrals, or conversions isn't necessary. This guide shows you how to get it up and running quickly, at which point you can tweak it for the type of reports you'd like to see.
What you need to get started with Google Analytics
Google Analytics is available for free as part of the Google Marketing Platform, and you can access it with your regular Google account or Google Workspace account. You'll still need to create a Google Analytics account using your Google account and then add your property to use the analytics tools.
-
Log in to your Google account and go to the Google Analytics homepage. Click the Start measuring button to enter the account setup.
 Google Analytics setup instructions
 -
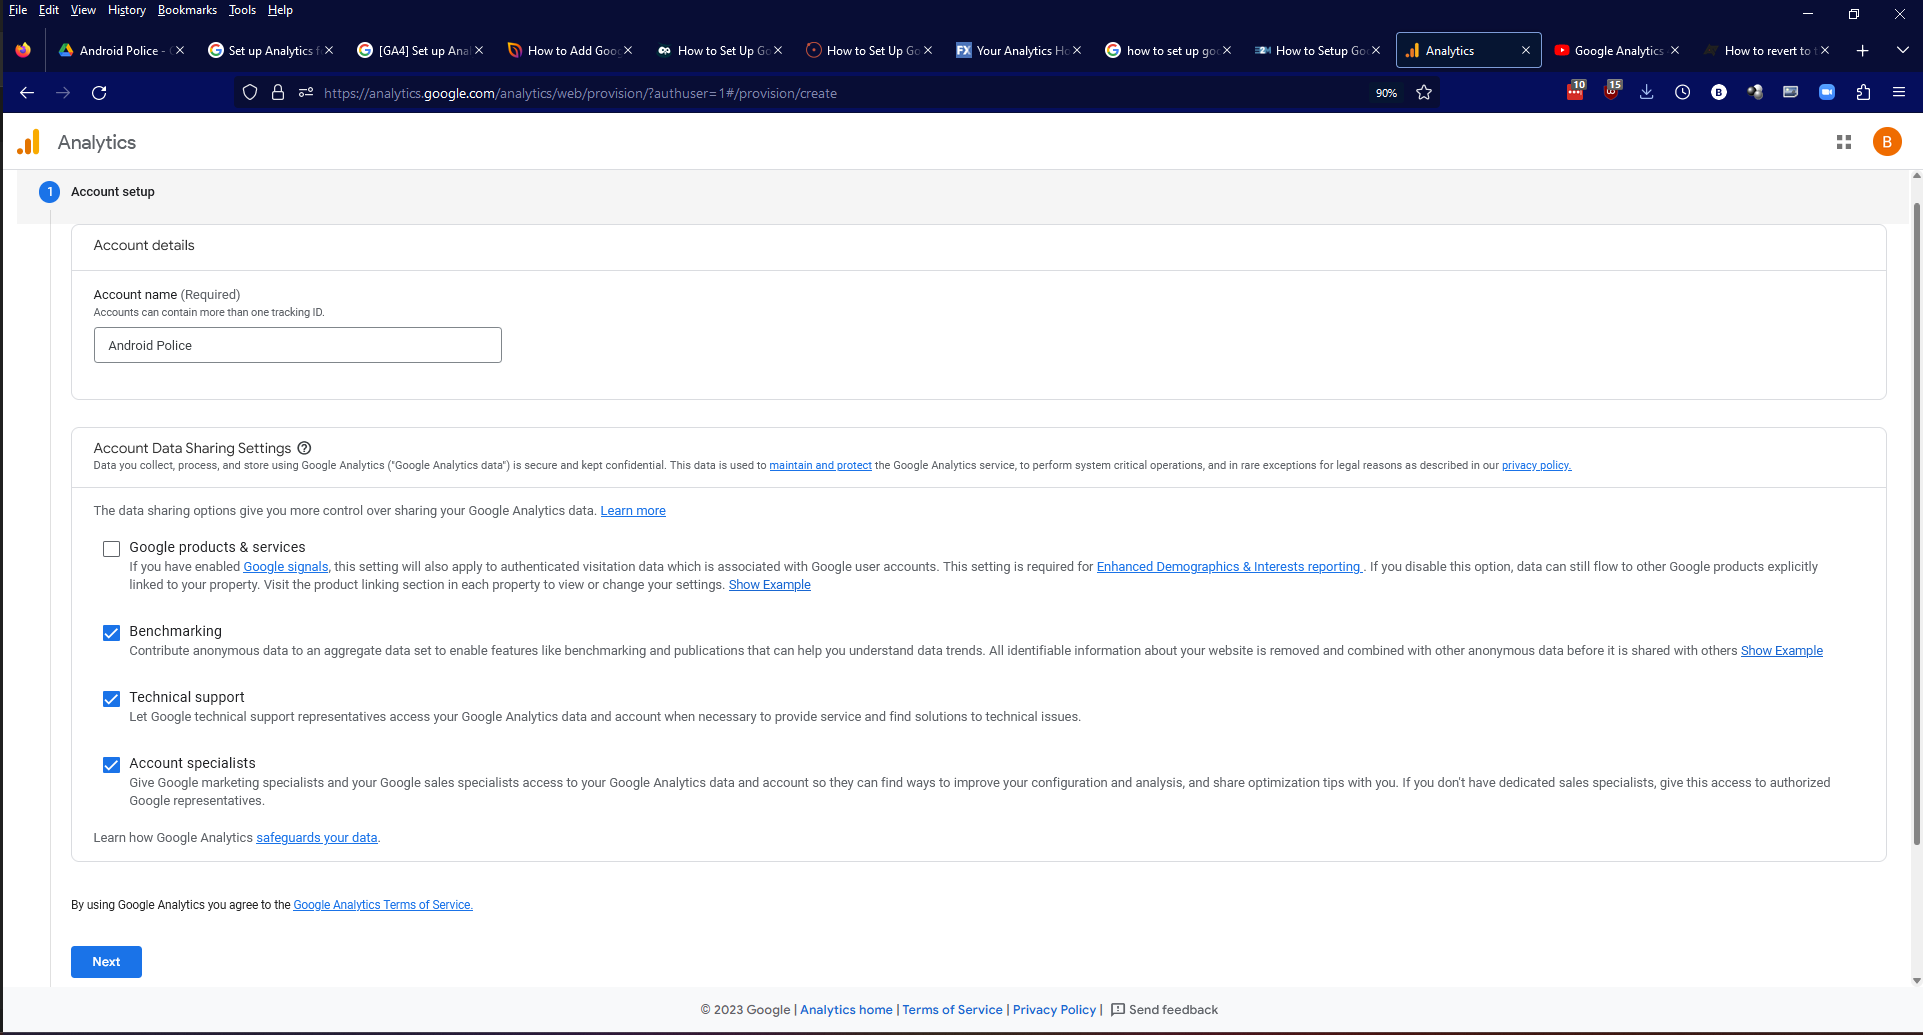
Enter your account name, choose your data sharing settings, and click the Next button. Leave the default check boxes if you don't have special data sharing needs. An account can have more than one property, like your website and mobile app.
 Google Analytics setup instructions


Create a new Google Analytics 4 property
This guide covers how to set up both a Google Analytics 4 and a Universal Analytics property, but you can choose to set up only one of these Google Analytics properties in the first step.
Creating both properties in this step sets them up in parallel, and once you add the Google tag or tracking ID for Google Analytics 4, data is collected on both properties. You can switch back and forth between them using the property selector at the top of the screen.
If you plan to set up both GA4 and UA, this is the time to do it. The established connection between them is important because it allows you to easily migrate configuration settings from Universal Analytics to Google Analytics 4 when UA is retired.
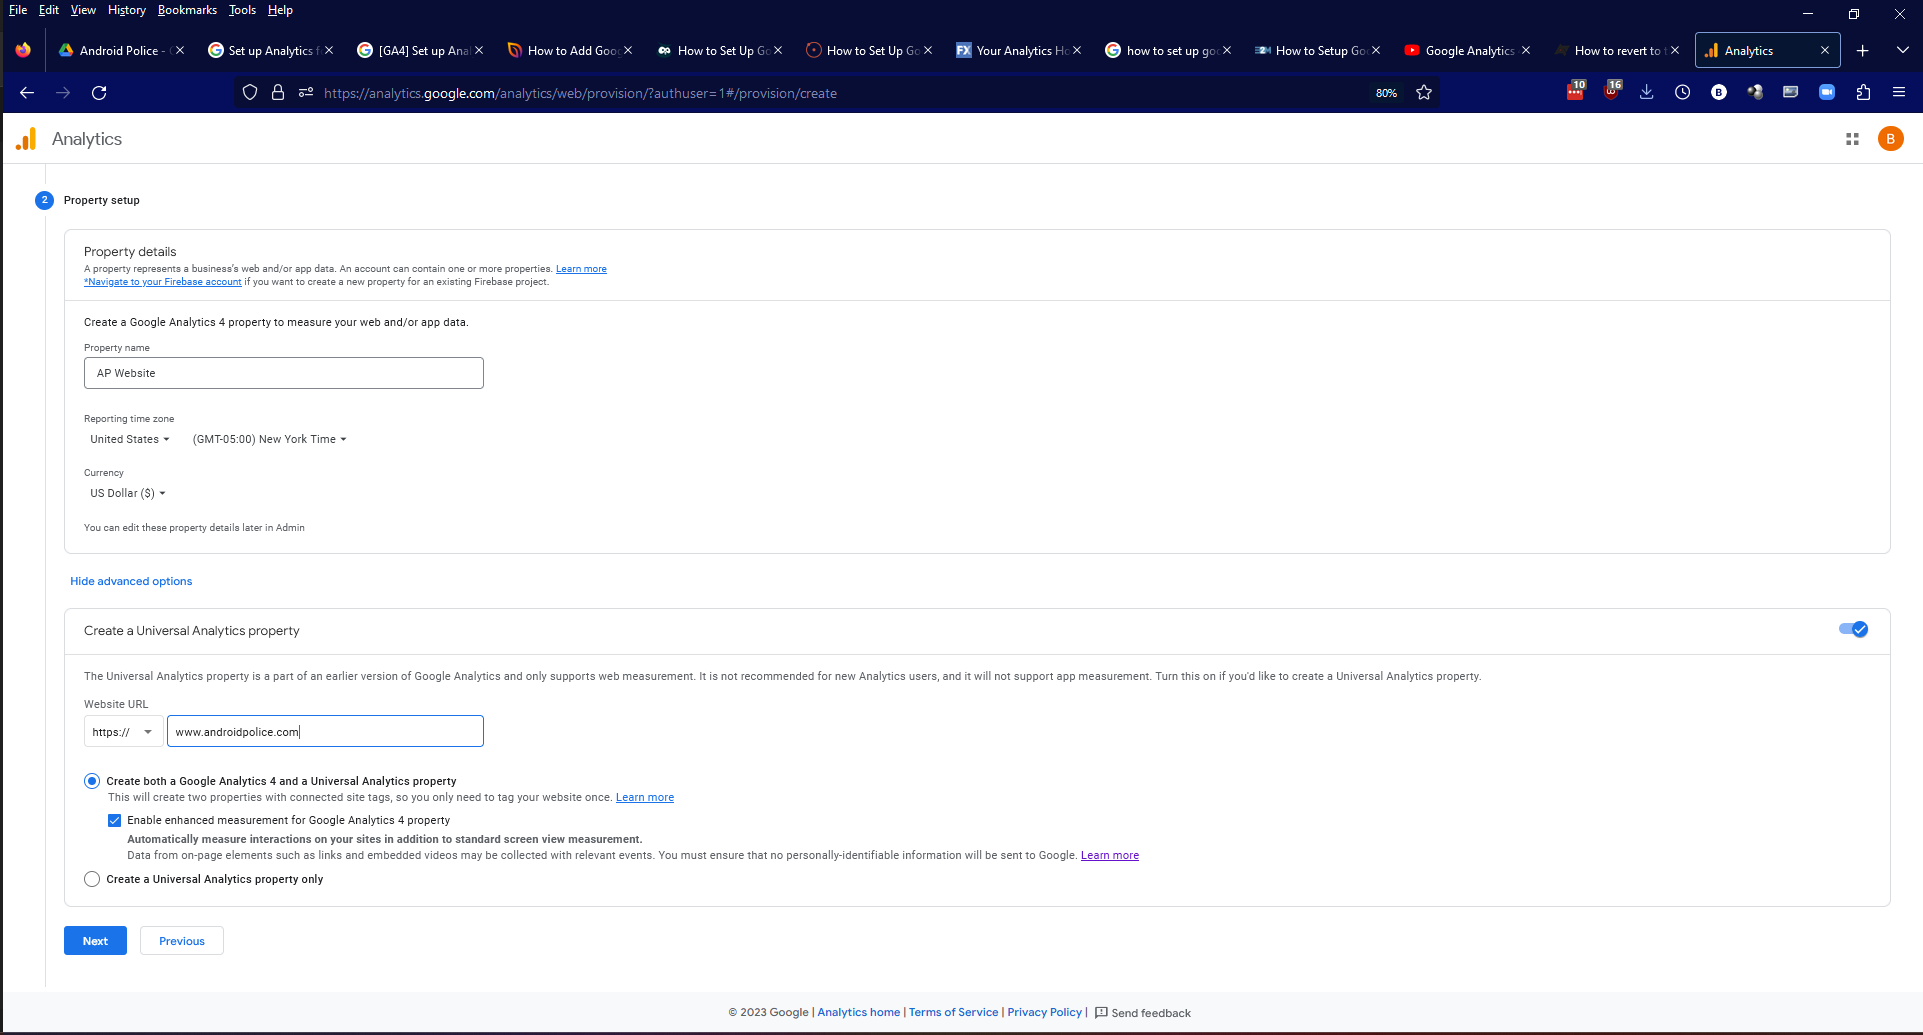
- Enter your property name, your reporting time zone, and the type of currency you use.
- Click Show advanced options and Select Create a Universal Analytics property.
- Enter your website URL.
- Select Create both a Google Analytics 4 and a Universal Analytics property.
-
Select Enable enhanced measurement for Google Analytics 4 property.
 Google Analytics setup instructions
 - Choose your industry category from the drop-down menu. If you don't know what to select, choose the closest option. You can also select Other if your industry isn't on the list.
- Add your business size based on the number of employees.
- Check all the boxes that apply to how you intend to use Google Analytics
- Tap the Create button when you've added all the information
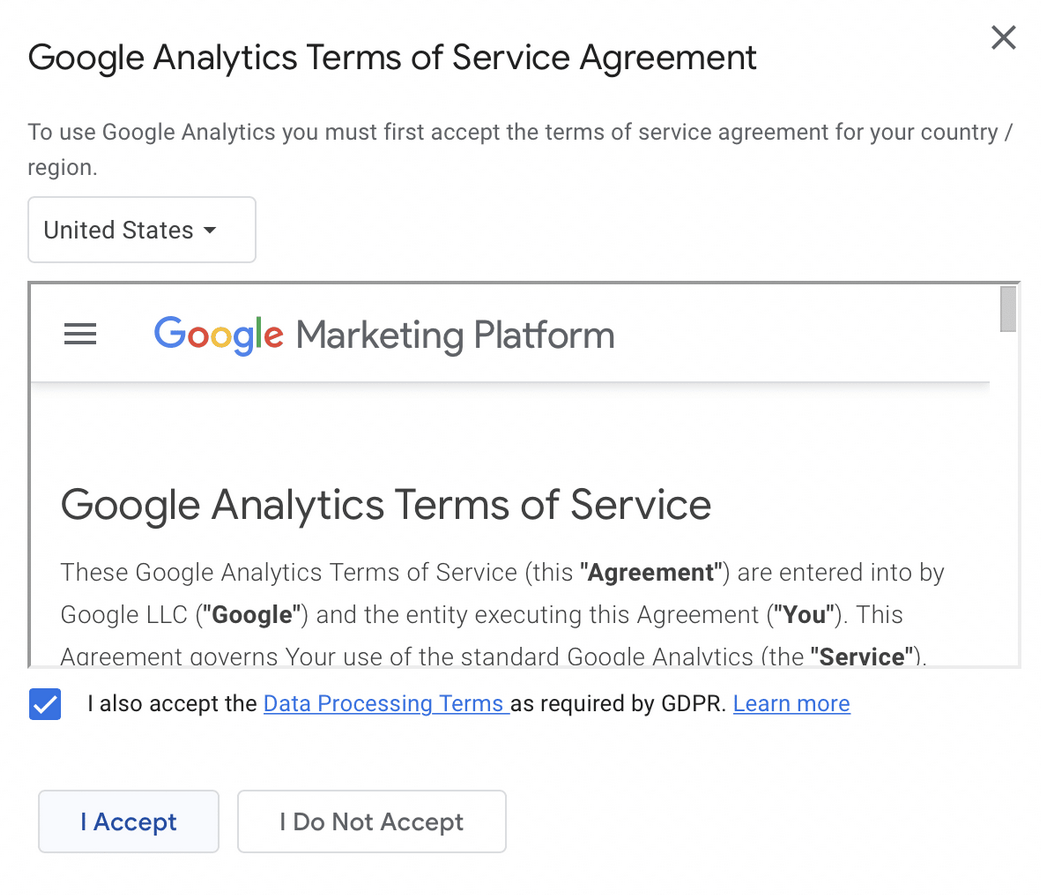
- In the Google Analytics Terms of Service Agreement pop-up menu, choose your country from the drop-down menu.
- Check the box to accept the Data Processing Terms as required by GDPR if they apply. The General Data Protection Regulation (GDPR) applies to all businesses operating in the European Economic Area (EEA).
-
Click I Accept, and you're ready to set up your new property.
 Google Analytics setup instructions


If you need to change property details like the property name, industry, time zone, or currency, you can find them in Admin > Property Settings.

Add a Google Analytics tag and get a data stream started
There are three approaches to installing a Google Analytics tracking ID on your website to gather analytics data. We'll cover the two easiest and most common ways in this guide. The third option is to use Google Tag Manager, which is a different service within the Google Marketing Platform. You don't need to use Google Tag Manager unless you use multiple tags across many pages.
Add your Google Measurement ID to a CMS-hosted site or website builder platform
If your site was made with a Content Management System (CMS) or website builder like Squarespace or Drupal, use the platform's built-in integration to make your Google Analytics setup easy. It's as simple as adding a single Google Analytics tracking ID code.
Most people will recognize popular building platforms like WordPress, Squarespace, and maybe even the online e-commerce site builder Shopify. These platforms use design templates called themes, many of which allow you to add your Google Analytics tracking code in the theme options menu. There's even a Material Design WordPress theme if you want to Google-fy your website. WordPress and other platforms that support plugins have several options that add the code for you and may also have some additional features.
Install Google Analytics Measurement ID on WordPress.com without a plugin
This section applies to Wordpress.com accounts. Wordpress.com is a for-profit, turnkey hosting service run by Auttomatic. Wordpress.org is a free and open source platform that is self-hosted.
Before we begin, to save you aggravation and money, you don't need the expensive WordPress.com Business plan to use Google Analytics. Even though Google's guided instructions suggest using plugins like its Site Kit for WordPress, you can enter your Measurement ID manually even if you have the Premium plan. Integration is not included in the basic Personal plan.
The option feels hidden away in the settings, and we wouldn't be surprised if some people felt they needed to purchase the Business plan and use a plugin to install Google Analytics. You'll need to use your Measurement ID from Google Analytics 4, and we cover how to find that in the next section. You can navigate to this page on WordPress and paste the code in later.
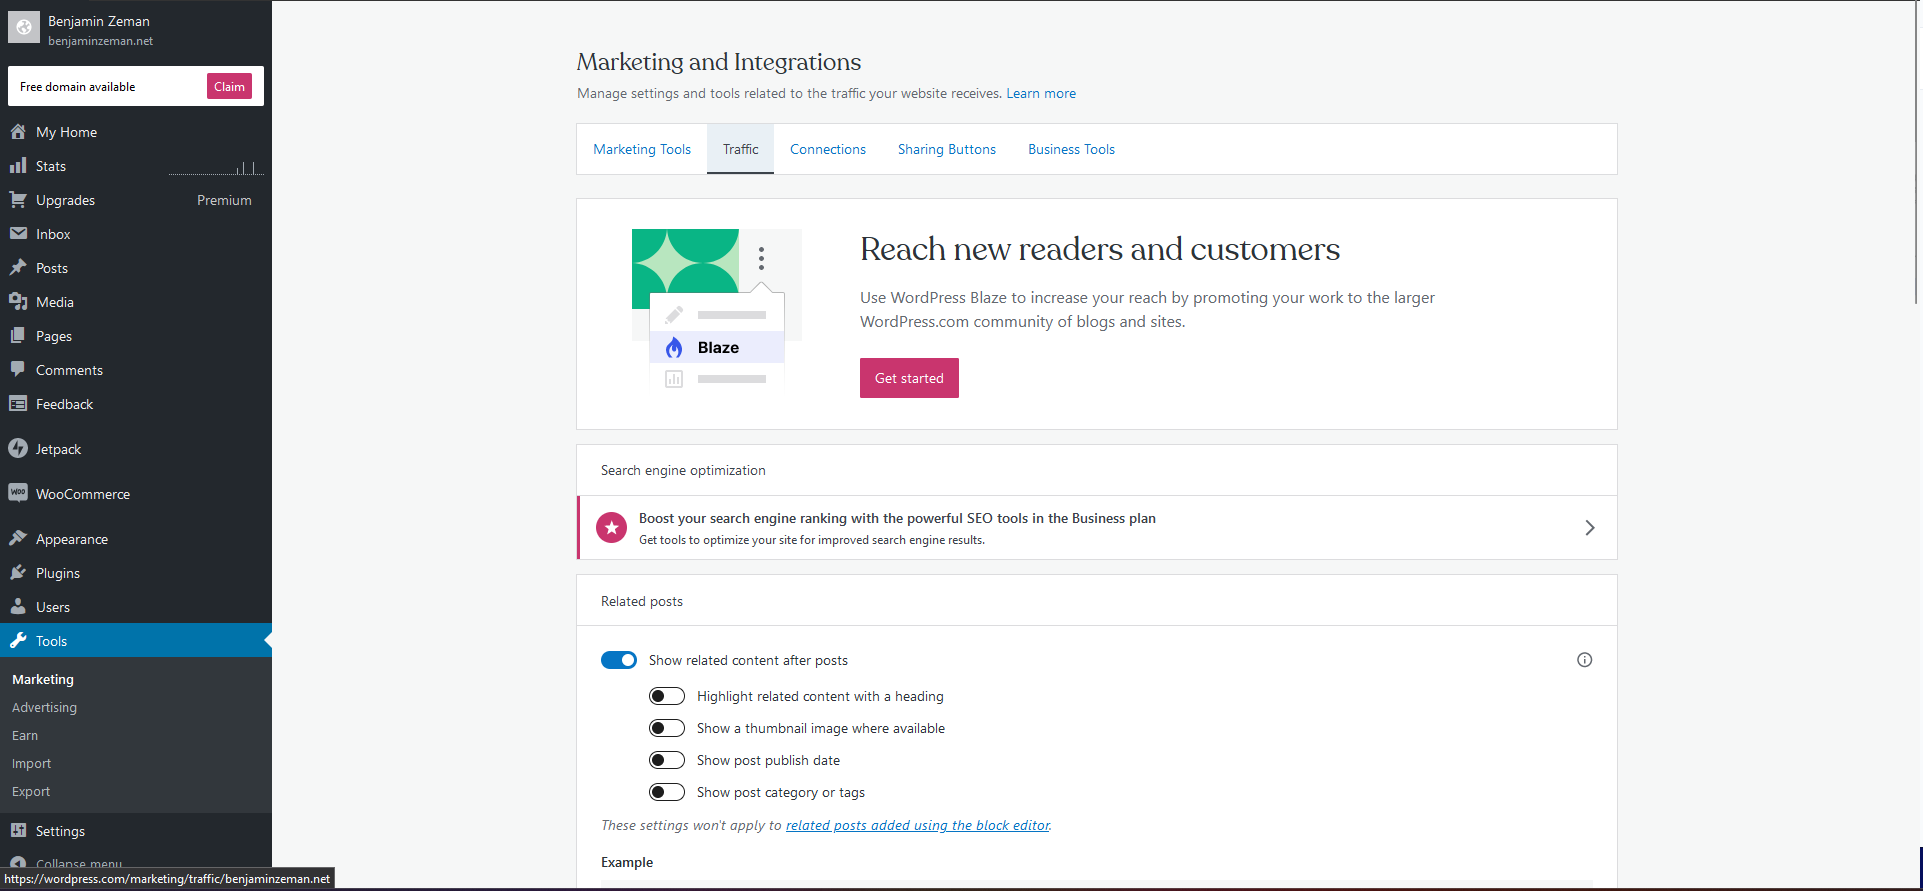
- Click Tools in the side menu and then click Marketing in the drop-down menu. You're brought to the Marketing and Integrations page.
- In the menu bar at the top, click Traffic.
-
Scroll down to the section for Google Analytics and turn on the switch if it isn't already.
 Google Analytics Instructions for integrating Google Analytics on a WordPress Premium plan.
 -
Enter your Measurement ID in the newly revealed field and click the Save settings button.
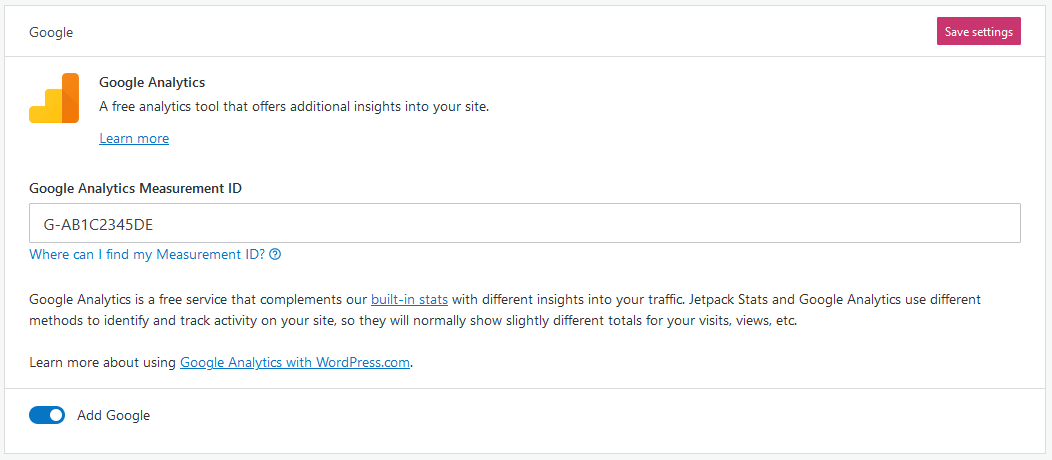 Instructions on how to integrate Google Analytics on a WordPress Premium plan.
 - Look for a pop-up menu in the upper-right corner. It has a green box with a checkmark that says Settings saved successfully.


Install Google Analytics using Google's guided instructions
Using Google's guided instructions is an easy way to tackle installing Google Analytics and the fastest way to find your Measurement ID.
-
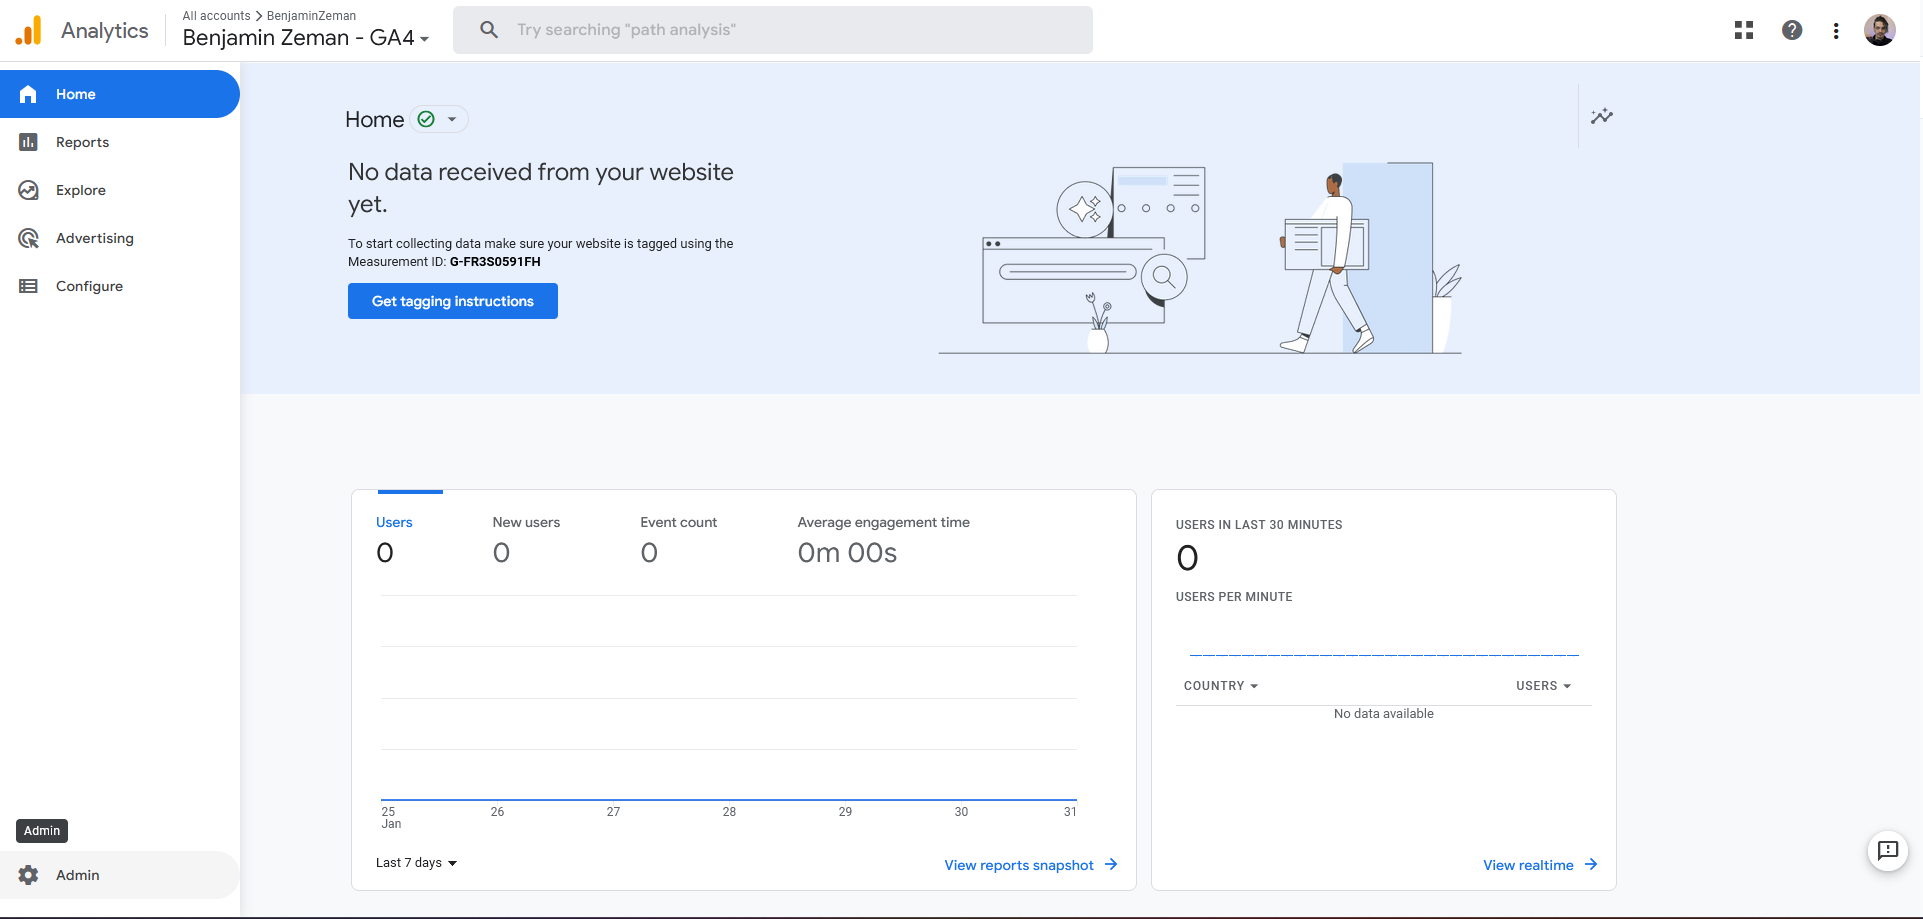
Click the Home icon in the upper left and then click Get tagging instructions. It automatically opens the Web stream details screen, and then the Installation instructions screen opens on top of it.
 Google Analytics setup instructions
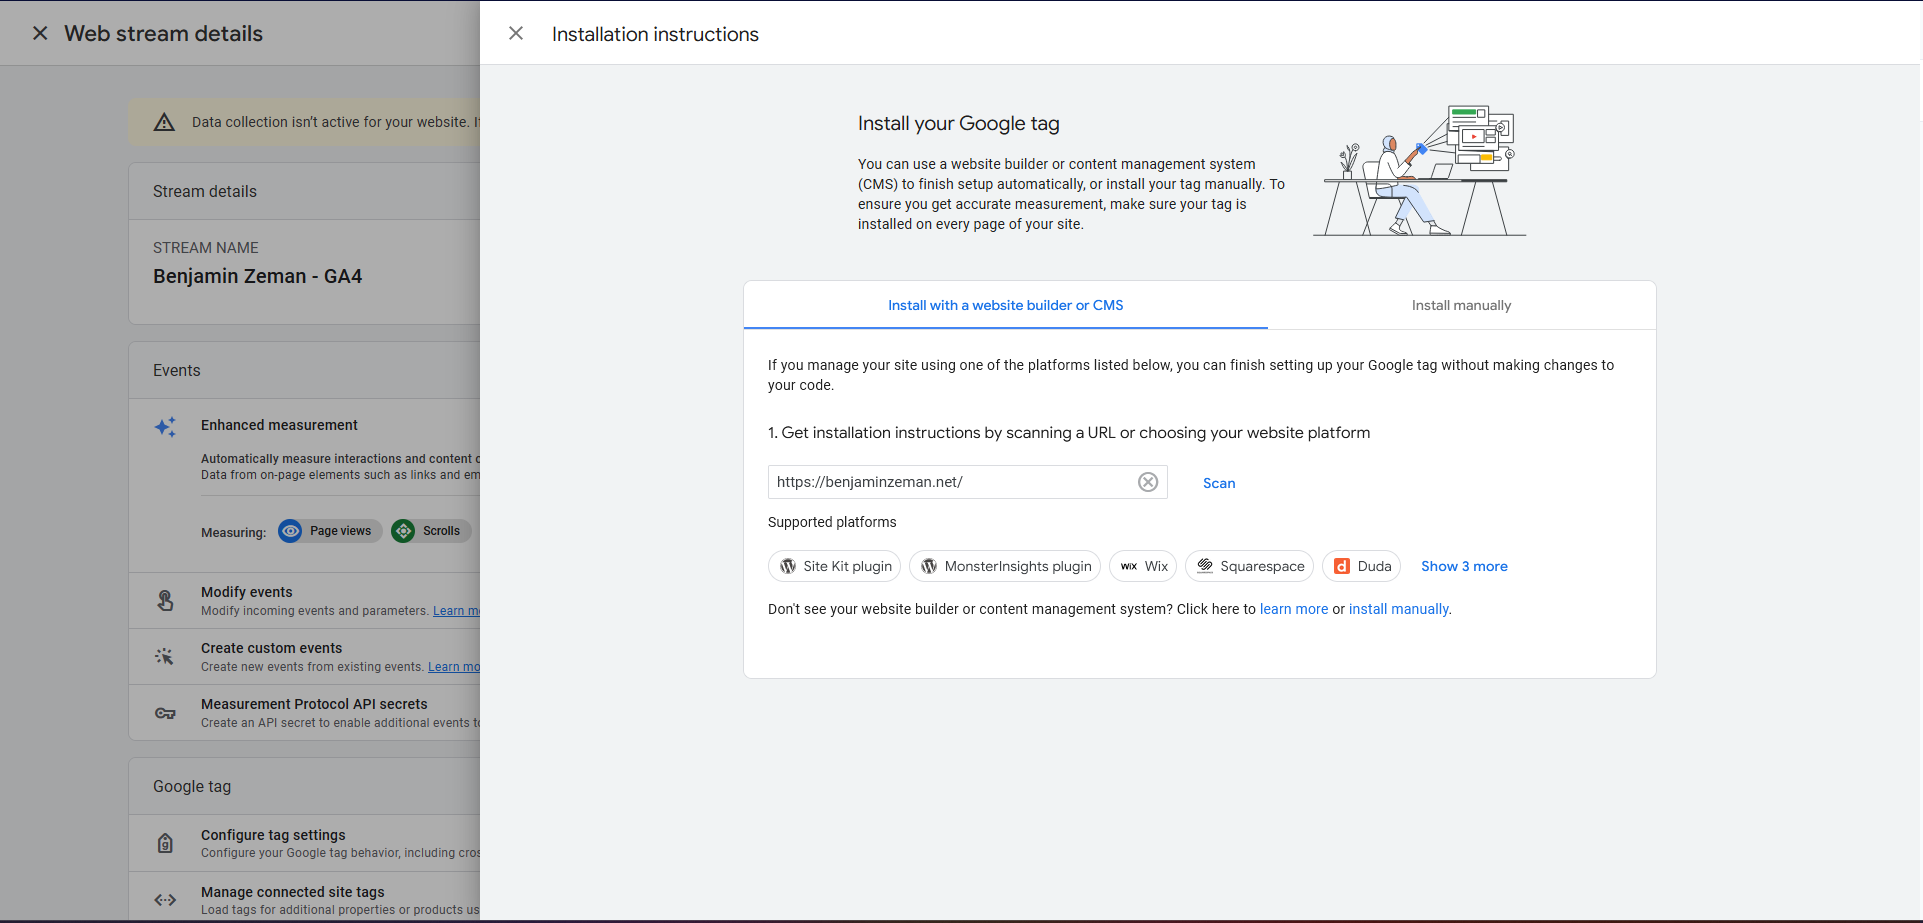
 - Go to the Install with a website builder or CMS tab.
-
Enter your website URL and click Scan. Or select one of the supported platforms to fill in the URL field.
 Google Analytics setup instructions
 - If you use a supported platform, you'll see a list of suggested plugins or instructions where you'll find the place to enter your Measurement ID in your platform's settings.


Don't worry if you don't see your platform in Google's tagging instructions. It only includes a handful of the most popular platforms, such as Drupal, WordPress, Squarespace, and Wix. If you use a different platform, you'll need to find your Measurement ID and enter it into your platform's theme or Google Analytics plugin.
- In Google Analytics, click the Admin button in the lower-left corner.
- Select the property you created. Unless you only created a Universal Analytics property, make sure you choose your Google Analytics 4 property.
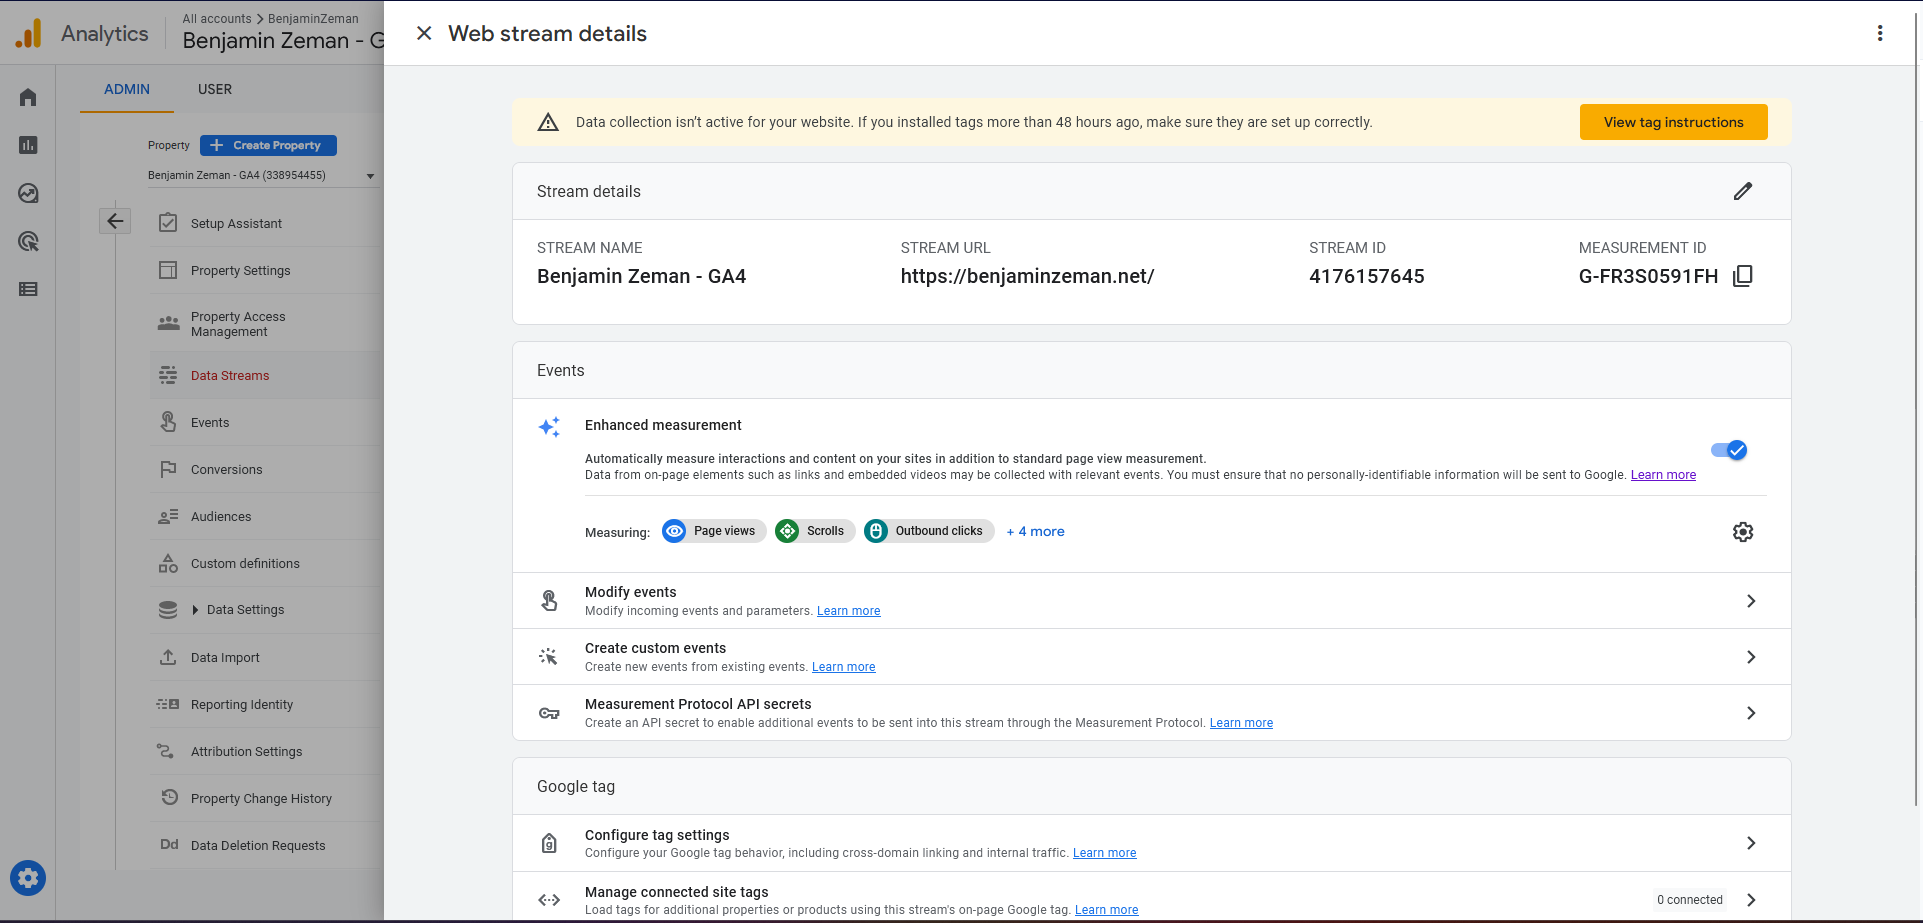
- This is where you'll find your Data Streams. You'll see the one already populated from when you set up your properties. Select it to display your Web stream details.
-
The tracking number you will use is called a Measurement ID and looks something like G-AB1C2345DE ("G-" followed by 10 characters). Click the Copy icon next to it to copy it to your clipboard.
- There are too many platforms to cover individually, so we suggest you search the plugins for "Google Analytics" or go to your theme options to enter the tracking ID.

The tracking ID looks different if you only set up a Universal Analytics property. You'll follow the steps above. Then, select your UA property on the Admin screen, click Tracking Info instead of data streams, and click Tracking Code. This code is called a Tracking ID instead of a Measurement ID and looks something like UA-123456789-1. Copy and paste it into the same plugins or theme settings for sites that accept UA Tracking IDs.
Many CMSs may not be as well-known, but they offer additional flexibility to individual needs and budgets. Your CMS likely has Google Analytics integration. If it doesn't, or you have a custom-built website, you'll need to add a tracking code snippet to each page of your website. Some CMSs have an option in the settings to add custom HTML, which is easier, so you may want to check out that first.
Add the Google tag to your web pages manually
If you custom-built your site without one of these platforms or your CMS platform doesn't have Google Analytics integration, you must manually add your Google tag JavaScript snippet. These used to be called Global Site Tags and are different from your Measurement ID.
In Google Analytics 4, this code snippet is now called a Google tag, which can be a little confusing. This code is placed in the header of all pages you want to track on your website. It's okay only to place the code on your landing page if you only want to track data from there.
- Click Admin in the lower-left corner, select your GA4 Property, and select your Data Stream.
- In Web stream details, click View tag instructions.
- Instead of typing your URL into the default screen, click Install manually.
-
Copy and paste the code on every page you want to track immediately after the <head> element. Your Google tag is unique to your account and looks like this:
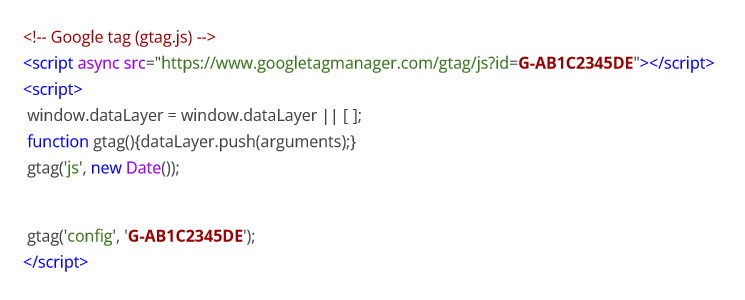

You might notice the bold parts look familiar. This is your Measurement ID from earlier. When a website builder or CMS platform supports Google Analytics Measurement IDs, it injects the same code, so you don't have to do it manually.
If you only install Universal Analytics, you'll find the Global Site Tag (gtag.js) in the same place you found your Tracking ID. You'll copy and paste it in the same place on your webpage, but it looks a bit different.

Track your website traffic with Google Analytics
There you go, you did it! You set up Google Analytics, and your data will start populating within 48 hours. Soon you'll be able to view the real-time report, which lets you monitor activity as it happens on your site or in your mobile app. You can see how many users there are whenever you want if you have the Google Analytics app installed on your Android phone, like our pick, the Google Pixel 7 Pro. You can also generate detailed reports after you've collected enough data and use it to change content to lower your bounce rate, design a successful social media campaign, and more.
Google Analytics immediately starts recording website traffic and demographics. However, if you want conversion data on how your audience uses your site, you'll need to set up a new goal. With goals, you can track events like making a purchase on an e-commerce site, signing up for an email newsletter, or tracking downloads as a goal conversion. You may want to create a filter so that you don't track yourself using your website or app.
Google Analytics has plenty of excellent competition
Google Analytics isn't your only option when it comes to tracking data, but it may be the most well-known analytics platform. Google Analytics 4 has its frustrations, so you may want to consider checking out other great alternatives like Amplitude, Chartbeat, and Pase.ly. Each platform has pros and cons, and some have functionality that GA4 lacks.