
While the Android 14 QPR beta program is still in full swing, Google has also started testing Android 15. Early developer previews are historically meant for, well, developers, which is why they are rather difficult to install. But that's different for the beta versions, which you can easily get onto your Pixel by joining the Android Beta Program. Here's what you need to know.
Android 15: Leaks, timeline, and everything new in Beta 1
Here's what we know about Android 15 now that the first beta has landedWhich devices work with the Android 15 Beta?
As usual, Google begins testing the new release on its own hardware only. That means you need a reasonably modern Pixel to join in on the fun. This is also the first year that only Tensor-powered Pixels are eligible for the next version of Android. Without further ado, this is the list of supported devices:
- Google Pixel 8 and 8 Pro
- Google Pixel 7a
- Google Pixel 7 and 7 Pro
- Google Pixel 6a
- Google Pixel 6 and 6 Pro
- Google Pixel Fold
- Google Pixel Tablet
How to install the Android 15 Beta, the easy way
Google encourages both developers and enthusiasts to test new Android beta builds. If you're interested, opt into the Android Beta Program and your phone will automatically install an OTA update. It works like the monthly OTA update you're probably used to getting already, except it installs the latest Android Beta instead.
The Android 15 Beta may be open to everyone, but it is still primarily meant for developers and can be unstable. It's pre-release software that can break in unexpected ways. To fix some problems, you might have to opt out of the program, meaning you will lose your data and will have to set up your phone again. It's best to have a reliable spare with stable software available for everyday use.
To install the current Android Beta or Android QPR Beta on your Pixel device, do the following:
- Visit the Android Beta Program page on a mobile or desktop web browser.
- Log in to your Google account if prompted.
-
Click the View eligible devices button to go to your Pixel device list.
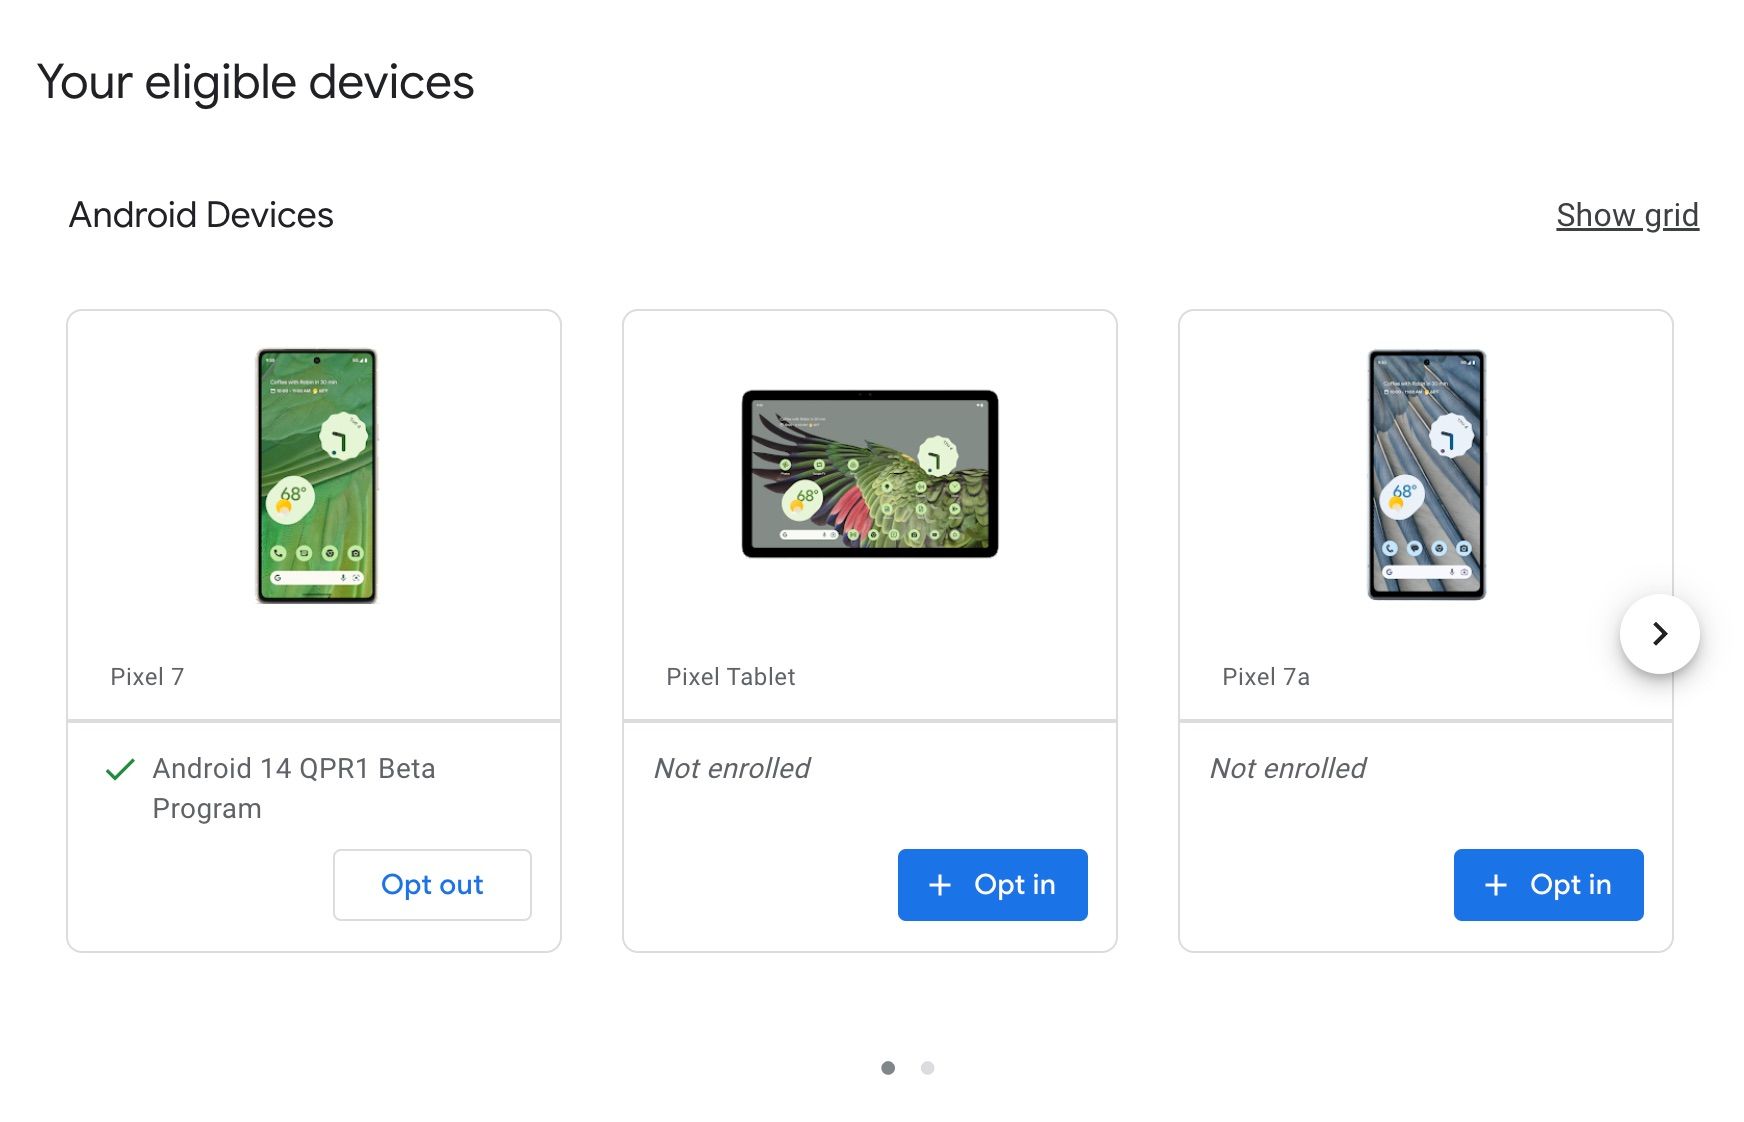
- Click the Opt in button under the Pixel phone you want to install the Android 15 Beta or 14 QPR Beta.
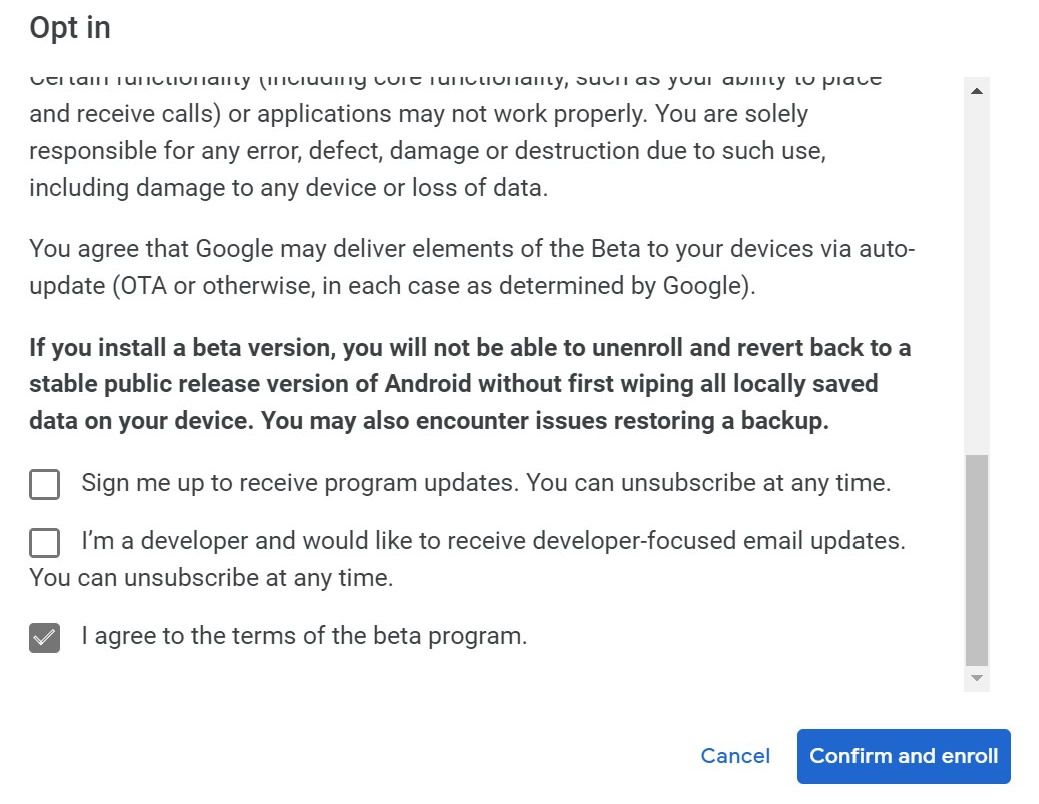
- Scroll through the terms and conditions page, then check the "I agree to the terms of the beta program" box. You can also check the other boxes to receive beta program updates via email, but it's not required for installing the beta.
-
Select the Confirm and enroll button to finish up here.


Now that your Google Pixel device is signed up for the Android Beta Program, you'll receive an OTA update shortly. You can wait for the system notification or go to Settings > System > System update to check for the update. Once the Android Beta OTA comes through, you can install it like a regular system update. When the installation process finishes, reboot your device when prompted. You can dive in from there and start testing the latest Android Beta on your Pixel.
Using the Android Beta Program is the fastest and easiest way to install any Android Beta. We recommend most people go with this method since all you do is opt-in and install the OTA update without touching any complicated developer tools.
Opt out of the Android Beta Program when you're finished testing
If you run into problems with your Android beta build, you might consider opting out of the Android Beta Program.
When you leave the beta program before the stable Android version you're testing is live in stable, your device will be wiped, and you lose all of its data when you return to the newest available public build. Before you install the downgrade, be sure to back up all of your data. To go stable without losing data, you need to hit the right time window between the beta and the stable release. Follow our news coverage to find out when that happens.
With this warning in mind, use these instructions:
- Visit the Android Beta Program page on a mobile or desktop web browser.
- Log in to your primary Google account if needed, the same that you use on your device.
- Click the View eligible devices button to go to your Pixel device list.
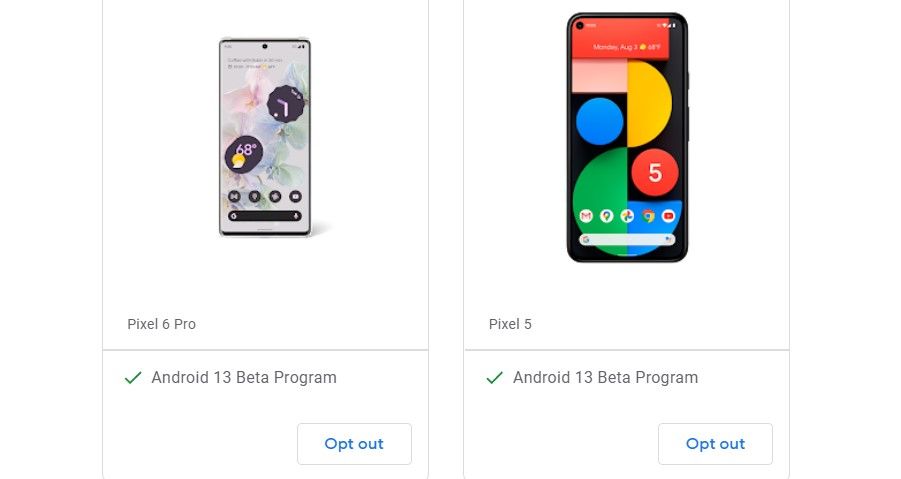
- Click the Opt out button under the Pixel phone you want to remove from the Android 14 Beta Program.
- Read the Opt out message to understand what happens to your device afterward.
- If you're running an Android beta, you get an automatic OTA update that wipes your device. It then installs the latest public build of Android from there. Back up any data before moving on to avoid losing your files or information.
-
Click the Leave beta button to remove your Pixel device from the Android Beta Program.
- Restore your device when required, and you'll be running the stable public version of Android from this point on.

How to manually flash or install an Android Beta
If you're feeling more adventurous, Android beta builds can also be installed manually. To start, you need to prepare your computer and your phone. Your phone has to communicate with your computer using its debugging mode, and your computer requires some extra software to send commands to your phone.
We strongly recommend you opt for the route described above. There is next to no reason to install these builds manually unless you're a developer and you have a very good reason to do so. That said, we still want to provide you with the necessary information to do this.
Once you've jumped through all the hoops described here, you will receive OTA updates, and your phone will automatically become part of the beta program once it starts for Android 15. Here are the perquisites and all the steps you need to follow:
Before you begin, make sure you have the following:
- A computer running Linux, macOS, or Windows.
- A supported device for the Android 15 beta, as listed above.
- A good cable to connect your computer (or phone with USB OTG) to your phone.
Set up Developer options on your phone
- Enable the developer options by navigating to System settings > About phone and tapping the build number seven times.
- Navigate to the top level of the system settings and head to System > Developer options.
- Look for the USB debugging toggle and turn it on.
Using the OTA installation route
Install the current release of the Nexus Tools by following the instructions in the linked GitHub repository. This automatically installs the necessary ADB developer environment on your computer that allows you to install OTA files from your computer on your Android phone.
Using the Android Flash Tool route
Make sure you have a supported web browser, such as Google Chrome or Microsoft Edge. The tool relies on WebUSB to connect your computer to your phone. It only works with a browser that offers this feature.
How to install the Android Beta using OTA files
Installing Android betas or developer previews using OTA files is generally the safest and easiest manual method, as it requires the least tinkering. Google offers the Android 15 OTA files on its Android Developers website, and the process is straightforward when you know your way around the terminal on your computer.
- Download the Android Beta or developer preview you're interested in for your device from the Android Developers website.
- Connect your Android phone with your computer using a USB cable.
-
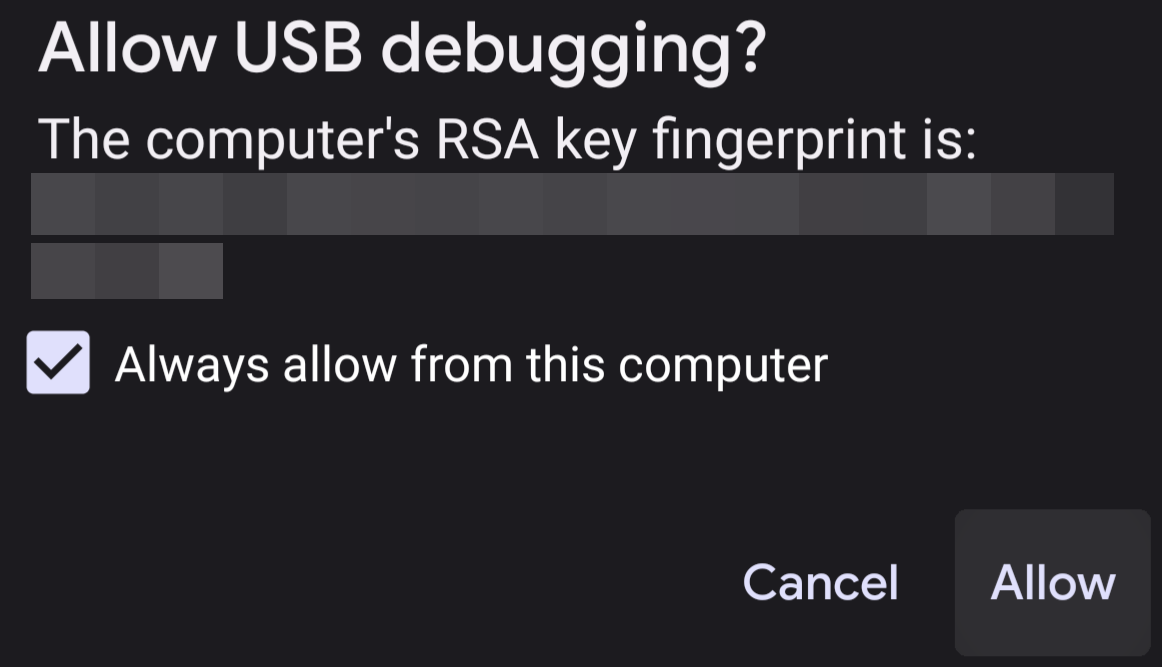
Authorize the USB debugging connection via the prompt that appears on your phone, and tick the Always allow checkbox.
-
On your computer, open the terminal and enter the following command:
adb reboot recovery
-
Your phone shows a screen with "No command" written on it. To ensure your phone is still properly connected, type or paste the following command and then press Enter:
adb devices
- If your phone is connected correctly, this shows your device's ID with "sideload" written next to it. This means your phone is ready to receive and install the OTA file you previously downloaded.
-
Enter the following command to install the OTA update, but replace ota_file.zip with the file that you downloaded in step 1:
adb sideload ota_file.zip
You may have to include the full path, such as C:\Users\YourUserName\Downloads\cheetah_beta-ota-upp1.230113.009-aac77d25.zip on Windows.

Next, wait for your phone and your computer to do their magic, and you'll have the latest version of Android up and running on your phone.
How to install the Android beta with the Android Flash Tool
Google has also made the Android 15 Beta available through the Android Flash Tool, which makes the manual installation process simple since you won't need any tools for the installation. The tool has built-in steps and tips to guide you through the process, but we'll go over the steps here to show you what the process looks like. To install the latest Android beta release using the Android Flash Tool, follow these steps:
You can use the same installation method described below to install the current stable version of Android on eligible Pixel smartphones if you want to return. Instead of selecting the beta, you should look for the latest public build and use that instead. Choosing which version to install is the only difference here. The rest of the instructions are identical.
- Plug your Google Pixel into a USB port on your computer.
-
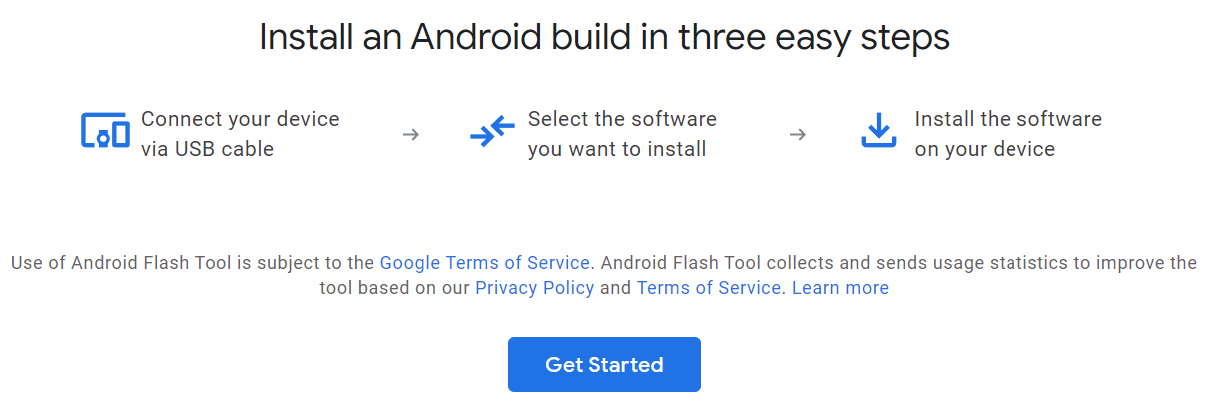
Visit the official Android Flash Tool website on your computer and click the Get Started button.
-
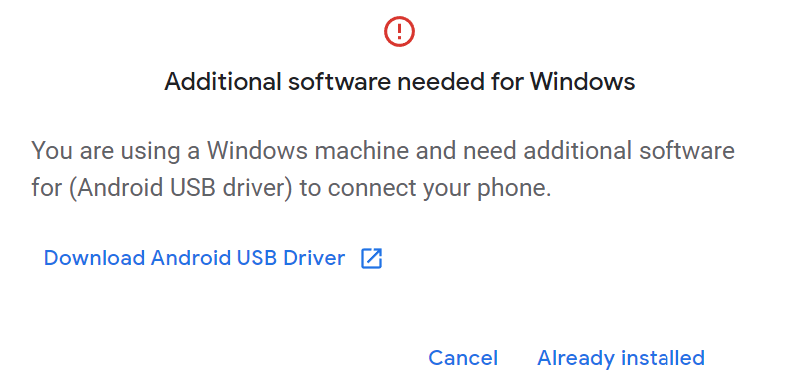
Tap Download Android USB Driver and follow the instructions if needed; otherwise, press Already installed to continue.
-
Click the Allow ADB access button so your computer and phone can share information bi-directionally.
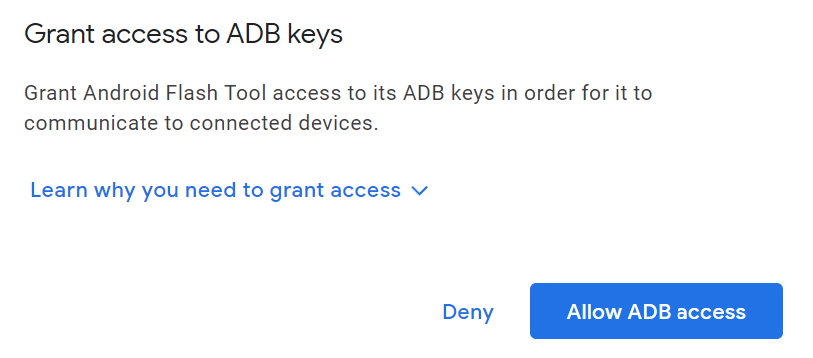
- On your Pixel phone, confirm the connection to your computer in the prompt by tapping Allow when required. You should also check the Always allow checkbox.
-
If you get the No devices available message on the Flash Tool, follow the on-screen steps to prepare your device for the installation. It also shows the No devices available message even if your device was prepared earlier. This is normal the first time around since you don't have any Pixel devices set up with the tool.
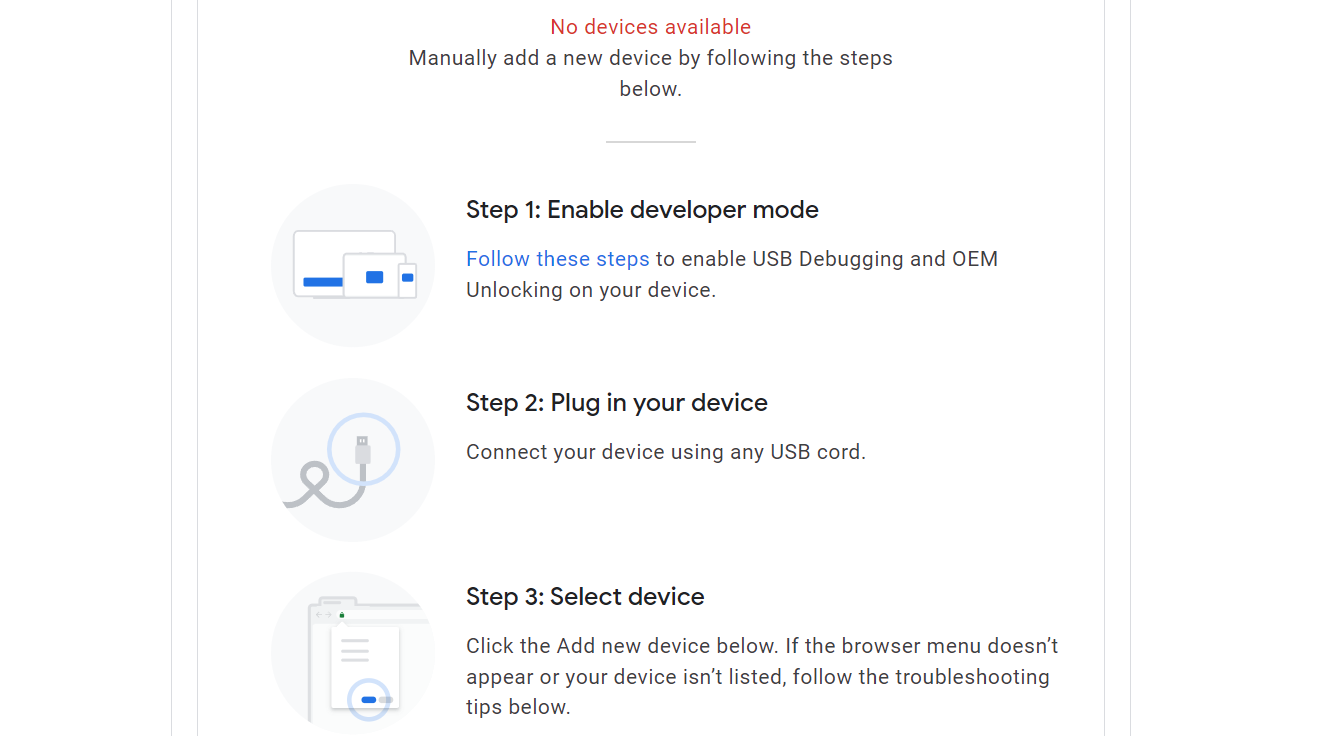
- Select the Add new device button once your device has been properly prepared.
- Select your Pixel in the menu popup, then click the Connect button.


Now that your Pixel phone is connected to your computer, you can search for the specific build you want to install in the Android Flash Tool. You'll find Android 15 under the Popular builds section.
Click the latest version to go to the overview screen for that build. If you want to install the latest public release for Android, select the Back to Public option, which installs the latest non-beta version of Android. By default, installing a preview build factory resets your device, relocks the bootloader, and replaces your previous system files with the new ones.

This is fine for most users, but you can also change these settings by pressing the pencil icon on the right. Hovering over the question mark for each option explains what it does, so you can disable or enable any of them as needed.

Once you've made your selections and are ready to install Android 15, press the Install build button to begin the process. It takes some time to complete, so be patient while it works its magic. Once the installation is finished, your phone automatically reboots and brings you to the Pixel welcome screen. Once you complete the initial setup, you're ready to test the shiny new preview build for Android 15.
We recommend the Android Flash Tool as the next best method. This is helpful for most users with its straightforward automated approach that requires minimal effort.
What is the Android 14 QPR Beta Program?
If you don't want to live on the bleeding edge and sideload Android, but would still like a preview of features before they become available for everyone, the Android 14 QPR tests might be for you. The Android 14 QPR releases went into testing in September 2023 while we were still waiting for a stable launch of Android 14. Despite this, Google decided to start testing the next release of its operating system already, and it offers more interesting features and design changes.
We're looking at three big milestone launches over the course Android 14's life cycle: Android 14 QPR 1 in December, Android 14 QPR 2 in March, and Android 14 QPR 3 in June. After this, Android 15 is next up.
Upgrading to the Android 14 QPR Beta Program makes you eligible for over-the-air (OTA) updates for future beta releases of the software. That means you don't have to manually install the next few updates on your phone and will always stay a step ahead of the public releases.
What devices are eligible for the Android 14 QPR Beta?
As with previous Android releases, only a limited number of devices are compatible with the beta. You can test it out on an emulator as part of Android Studio or flash it on a Pixel device if you have a recent one.
Here's the full list of supported devices:
- Pixel 5a
- Pixel 6 and 6 Pro
- Pixel 6a
- Pixel 7 and 7 Pro
- Pixel 7a
- Pixel 8 and 8 Pro
- Pixel Fold
- Pixel Tablet
You can follow along with Google's progress with pre-release versions of Android
Once the Android 15 Beta is installed, future releases are delivered like regular over-the-air updates, making it even easier to stay up to date. To learn more about Android 15 in detail, check out the complete list of changes and features in our ultimate Android 15 guide.