It's 2023, and ChromeOS is no longer an operating system that hosts a web browser only. It has several productivity and neat add-ons to multitask like a pro. Apart from a split-screen to view two apps side-by-side and an app switcher menu, you can create multiple desktops for a smooth workflow.
Whether you plan to get a new top Chromebook or already have one, we recommend familiarizing yourself with virtual desktops (as Google calls it) to reduce clutter and distraction. Before diving into virtual desks on Chrome OS, let's first understand the new multitasking trick and why you need to use it.
What is a virtual desktop on a Chromebook?
As the name suggests, a virtual desktop lets you create several desktops on your Chromebook for specific purposes. It divides your desktop into several workspaces to improve productivity and better manage your workflow. After testing it for months with users, the search giant finally announced virtual desktops with Chrome OS 76 in August 2019. You can create up to eight virtual desktops on your Chromebook.
Virtual desktops are standard on Windows and macOS, and it's good to see Google implementing the same functionality on ChromeOS.
Why should you use a virtual desktop on ChromeOS?
With Linux and Android apps support, it's easy to pack your Chromebook with dozens of apps. When you have several apps and browser tabs open in the background, switching between them can get cumbersome and confusing. It affects your productivity hours, too. Instead of closing essential apps and tabs, you can create virtual desktops and organize your apps and browser tabs efficiently.

For instance, you can keep your productivity apps and tabs like Microsoft Office, Google Docs, Google Keep, and more under a specific workspace. You can create another virtual desktop like Social Media to arrange Google Chrome tabs, Twitter, LinkedIn, WhatsApp web, and similar apps. Think of virtual desktops as folders on your phone where you can organize similar apps under a single category.
If you haven't used a Chromebook before, read our dedicated guide on ChromeOS to familiarize yourself with Google's desktop operating system.
How to create a virtual desktop on Chromebook
There are two ways to create a virtual desktop on a Chromebook. You can use a keyboard shortcut or rely on the overview menu.
Use a keyboard shortcut to create a virtual desk
Press the Shift+Search+Equal buttons to create a new virtual desk on ChromeOS.

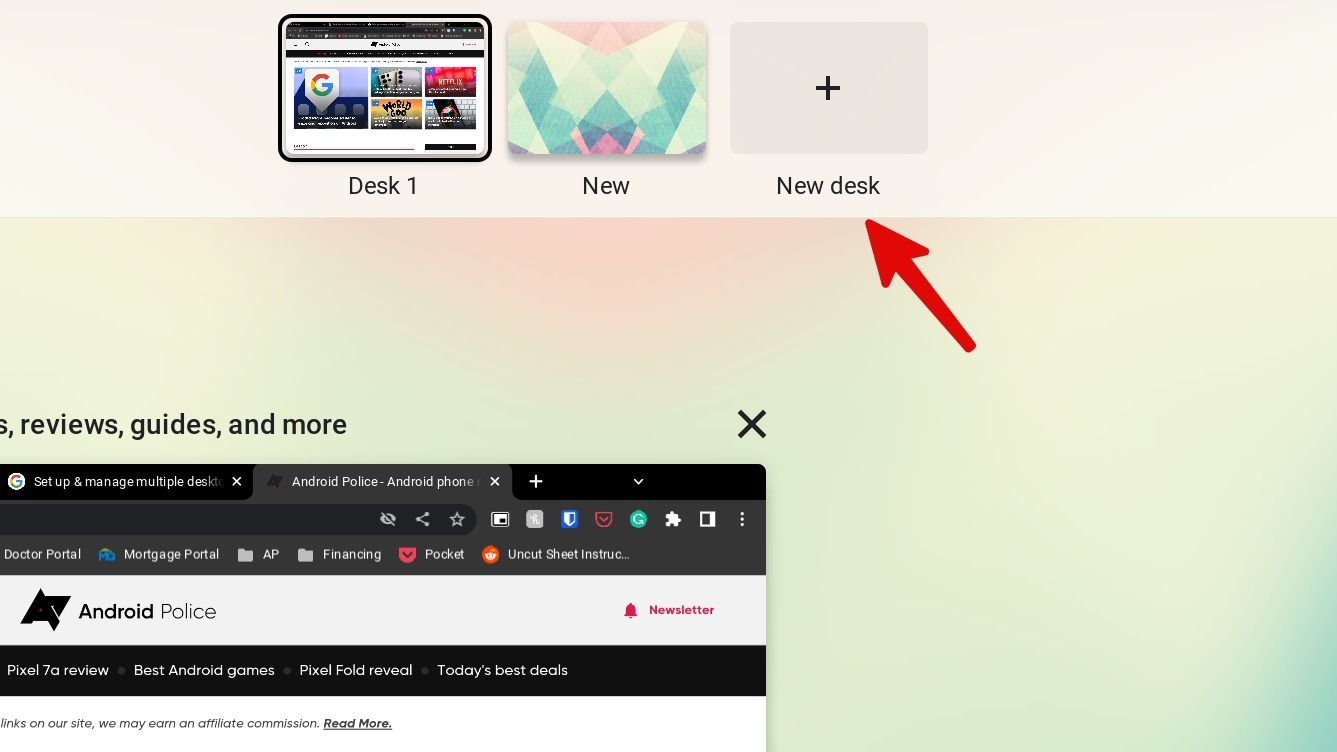
Create a virtual desktop from the overview menu
The overview menu lets you create and manage virtual desktops on a Chromebook.
-
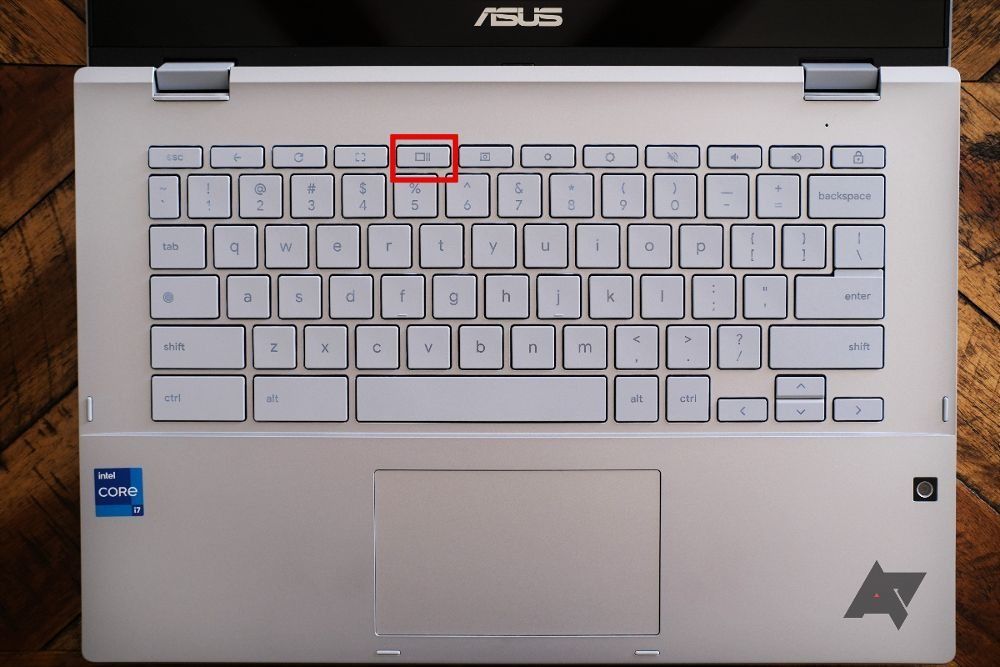
Press the Show windows button on your keyboard. You can also use the three-finger swipe-up gesture on your trackpad to check the overview menu.
-
Click New desk, give it a relevant name (such as Business, News, or Productivity), and press Enter.
-
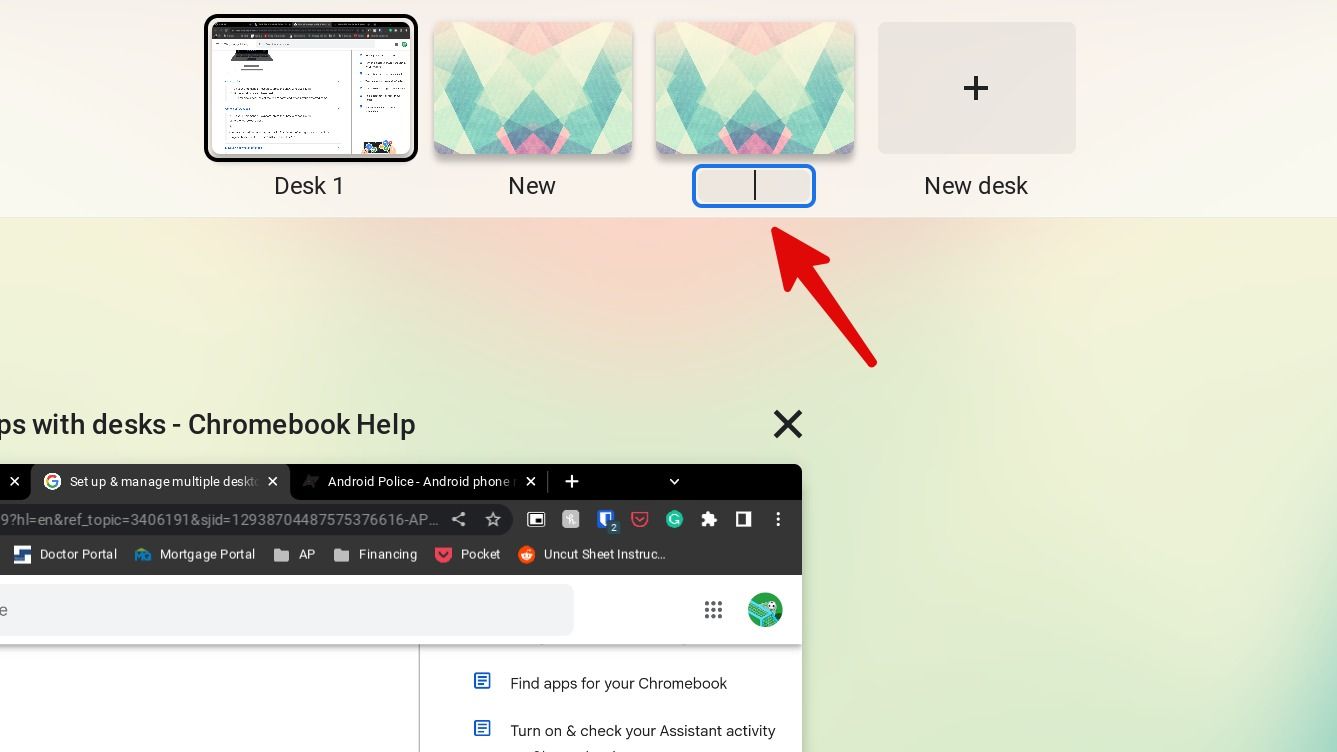
If you don't rename a virtual desk, ChromeOS automatically assigns generic names like Desk 2, Desk 3, up to Desk 8. You can click the new desktop to add or move apps.


Switch between virtual desktops on Chrome OS
Switching between virtual desktops is seamless on your Chromebook.
From the overview menu
You can press the Show windows button on your Chromebook keyboard, check the overview menu, and switch between several desktops from the top.
Use keyboard shortcuts
ChromeOS comes with thoughtful keyboard shortcuts to navigate the system like a pro. One such keyboard shortcut is Search+Left Bracket ([) or Right Bracket (]) to move between virtual desks.
First, create multiple desks on your Chromebook and use Search+Right Bracket to a relevant desktop. You can press Search+Left Bracket to go back to your main desktop (Desk 1).

Use trackpad gestures
If you want to navigate virtual desktops without lifting your fingers, use the trackpad gestures. Swipe four fingers left or right on your Chromebook touchpad to check active windows.
Manage apps and windows in virtual desks on Chrome devices
Now that you know how to create and switch between virtual desktops on your Chromebook, it's time to arrange apps and browser tabs in them.
Press the overview button on the keyboard and drag and drop the opened app or browser tab to another desktop. There is a better and more efficient way to move an app from one desktop to another quickly.

You can open an app and press the Shift+Search+Right Bracket keys to move it to Desk 2. Similarly, you can press the Shift+Search+Left Bracket keys to move an active app or tab to a left virtual desktop. Chrome OS immediately moves the app and frees up the space on the current desktop.

Rename and rearrange multiple desktops on a Chromebook
If you don't change names while creating a virtual desktop, ChromeOS adds standard names like Desk 2, Desk 3, and so on. You can always change it to relevant names.
- Access the overview menu with a keyboard shortcut key or trackpad gestures.
-
Click the virtual desktop name and rename it. Press Enter.
Save or close virtual desktops on ChromeOS
Once the virtual desktops serve the purpose, you can save or completely close them. If you plan to use the virtual desktop in the future, save it for later. Here's how.
- Open the overview menu on your Chromebook (check the steps above).
-
Click Save desk for later in the upper-left corner.
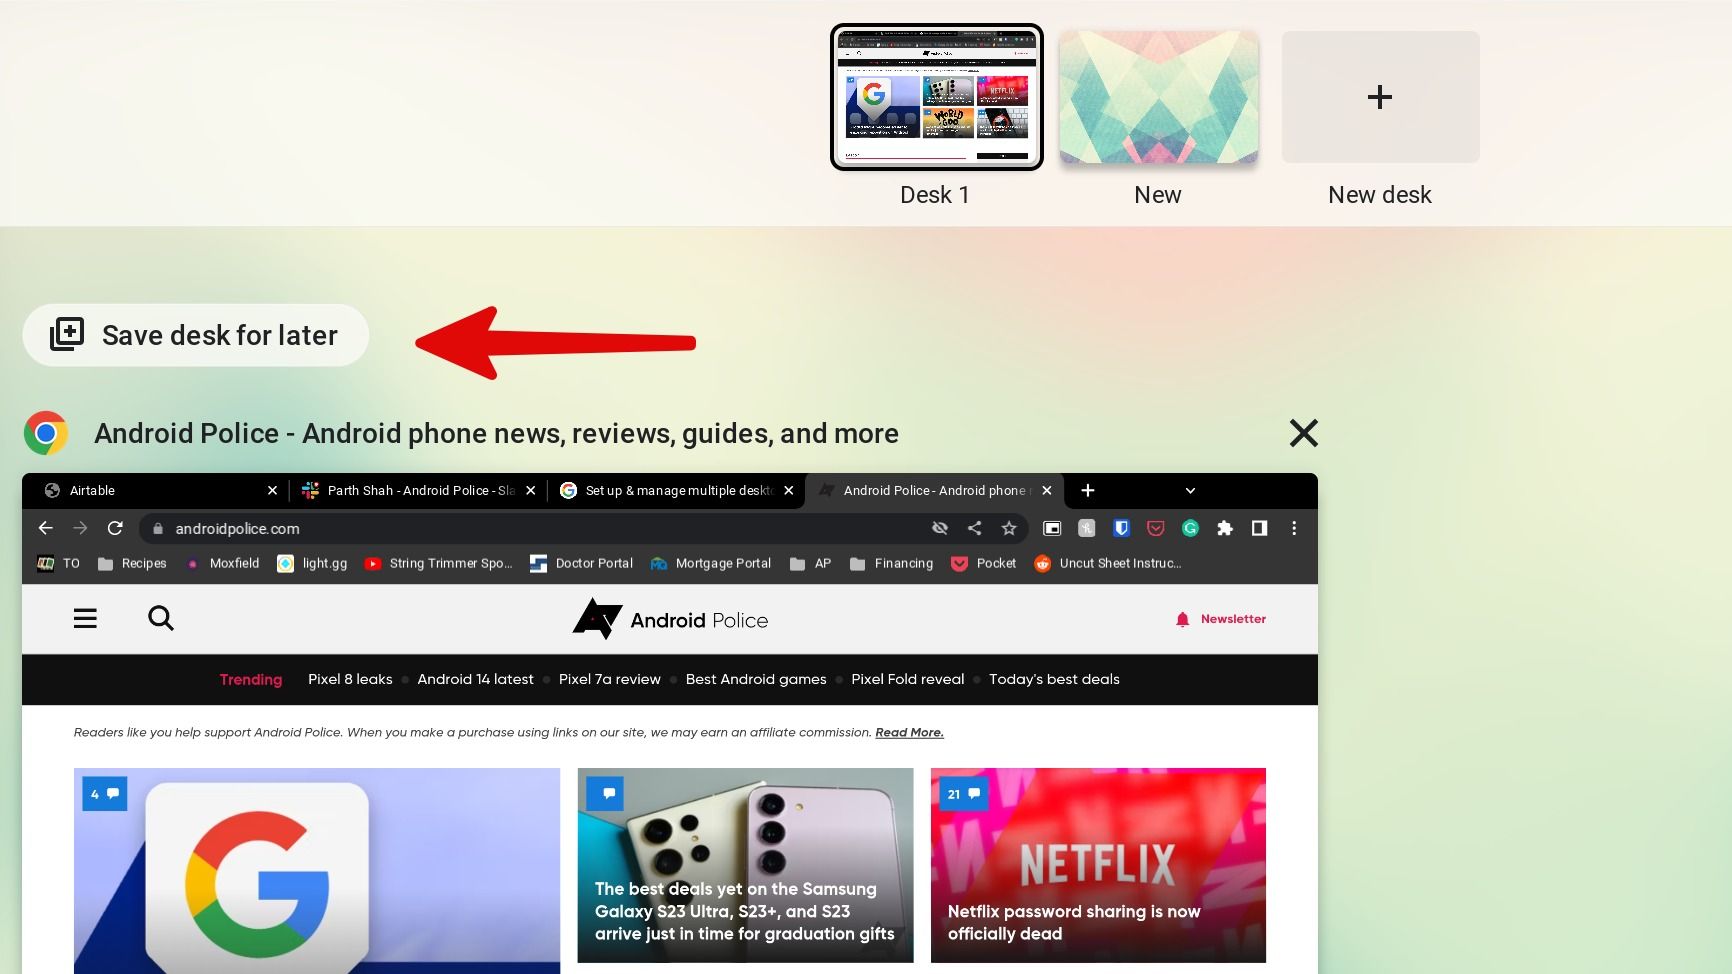
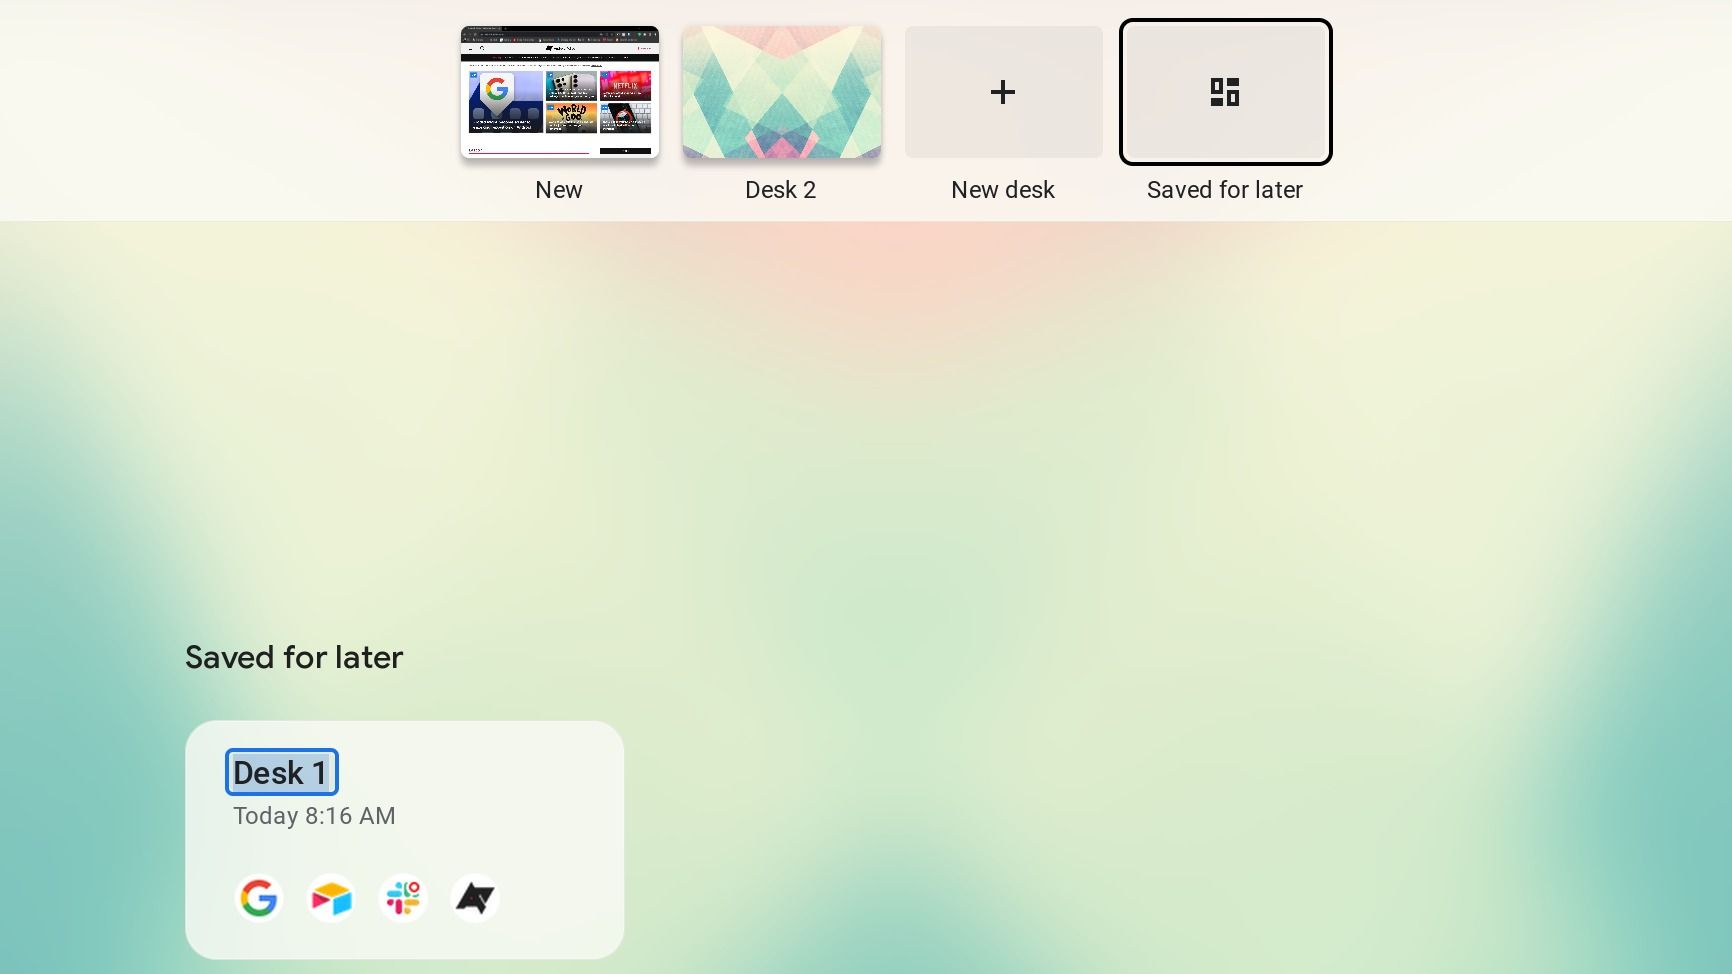
- ChromeOS saves the desk for later. You can check the time, date, and apps overview on the desktop.
-
You can glance over saved desktops from the overview menu. You can check the screenshot below for reference.


Click the X mark in the upper-right corner of a desk to close it. Close irrelevant desks so they don't consume CPU power on your computer.

Fly through your tasks on a Chromebook
ChromeOS can be a new experience for users coming from Windows or Mac. Check our post to learn the top ChomeOS tips and tricks. What are you waiting for? Download apps from the Google Play Store, create a new virtual desktop, and optimize your workspace in no time.