Google Photos isn't available on Android TV, and for good reason. As long as you can cast any photo or video from your phone to your TV, you don't really need the full app to be installed on the latter. However, there are a few reasons why you might want to get the proper Photos app installed and for that, we have this tutorial. It's a very convoluted process, especially if you own a Chromecast with Google TV (but much less so if you own an NVIDIA Shield), and you're better off not wasting your time with it unless you really need it.
Why get the Google Photos app
I could talk about how more convenient it is to browse your gallery directly on the TV instead of looking down at the phone then up at the big screen, but really that's a tiny nitpick. As far as I'm concerned, there are only two valid reasons to get Google Photos running on your Android TV.
The first one is to set up automatic backups and sync your screenshots to other devices. This is clearly something only tech writers, gamers, app developers, or tutorial writers would find useful. For most other people who don't need the automatic backup to kick in each time they take a screenshot, there's always a slower manual way to send screenshots to other devices — uploading from Solid Explorer to Google Drive, or using Send Files to TV are two methods I've often used.
The second reason is to allow someone who doesn't have a smartphone to browse your gallery on the big screen. It could be younger kids or elderly people, or anyone else who doesn't have a phone or tablet, and you want them to be able to access the gallery and check some pics or videos when you're not around to cast the content to the TV.
Missing features, plenty of inconveniences
For those of you who feel like rebels and think they'd still want to access Photos on the TV, let me take a moment to deflate your enthusiasm. Even when you get it running, the experience is nothing like you're used to. This is the same Photos app but the interface isn't optimized for Android TV, so a lot of the features just aren't available.
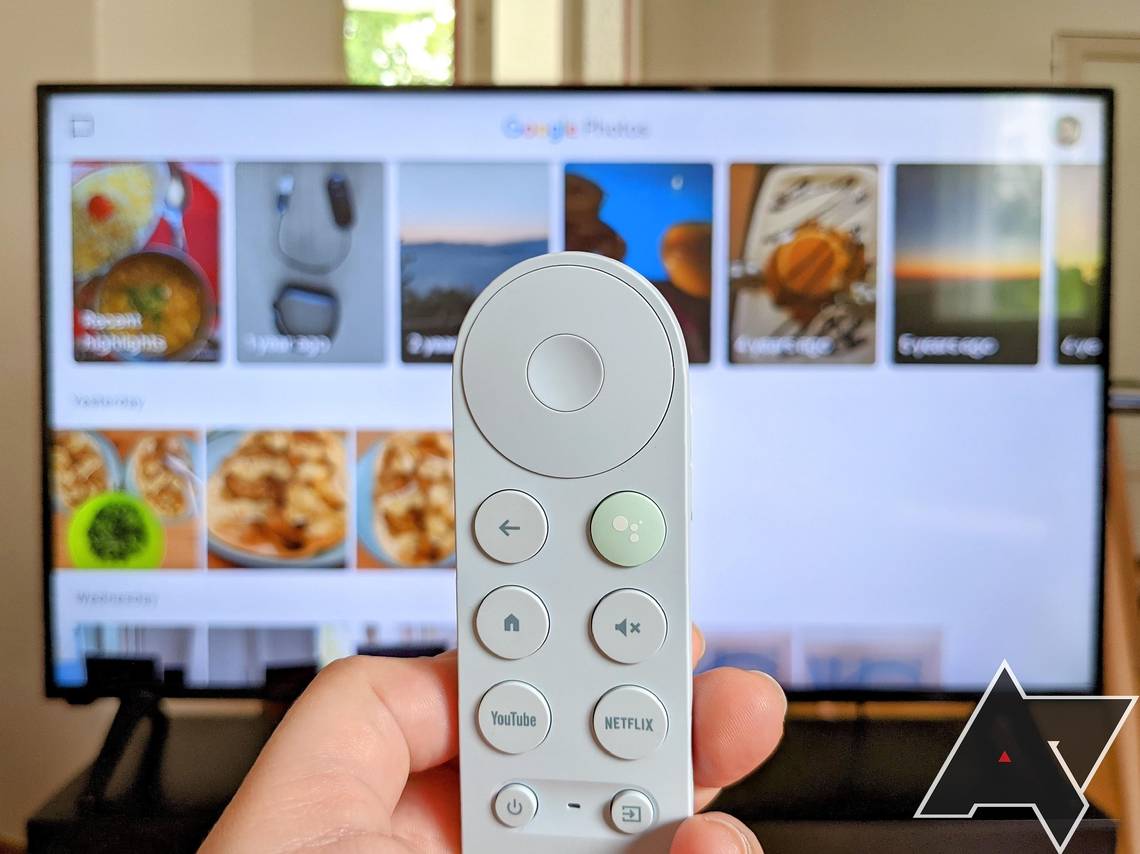
For one, the bottom tabs we're used to seeing on our phones aren't visible on TVs, so you can't go to the search tab (people, places, things) or access your library (albums, favorites, archive). That means you can only browse shared albums — through the conversation bubble on the top left — but even then, only the first two rows of pics are accessible, and not the entire album. For some reason, it's impossible to scroll past them.
And we haven't even gotten to the biggest downside of the experience: You can't press next (right) or previous (left) on your remote's D-pad to move between fullscreen media. Instead, you have to open each image or video one by one, then go back and choose another.
All the icons here aren't accessible with a TV remote's D-pad.
That only leaves some limited functionality. Besides browsing one by one, you can tap and hold to select items then share, delete, archive, or add them to an album. You can also set up automatic backups for specific folders.
Using a USB or Bluetooth mouse might improve the situation a bit, but still, a lot of the features remain inaccessible due to the way the app is presented on Android TV. Overall, what's here isn't worth the hassle for most people.
Step 1: Install Google Photos on Android TV
If, after all of these warnings, you're still excited to get Google Photos to run on the TV, brace yourself. The process isn't for the unexperienced or the faint of heart. If any terms I use below seem confusing, you're better off skipping this whole bidness altogether.
Download the latest Google Photos APK
Since browsers on Android TV are mostly crap, it's better if you kick this off on you phone. You need to start by grabbing an installation file for Photos that's compatible with your TV.
Of course, we recommend going to our sister site APK Mirror and getting the latest version. Your best bet is to get a full APK, i.e. skip the ones that have a "bundle" notice next to them. The variant to grab will depend on the TV you have. For example, you need the v7a processor variant for the Chromecast with Google TV, and the v8a one for the Nvidia Shield.
Sideload it
The next steps are to send this APK over to your TV and install it there. I won't go over these two steps in detail here because we've already written separate tutorials for them:
- sideloading APKs on any Android TV
- sideloading APKs on the Chromecast with Google TV — beware, there are a couple of additional steps here (4.1 and 4.2) that only apply to this Android TV device, as far as we know.
Step 2: Find, launch, and browse Google Photos
Photos being an unsanctioned app on Android TV, it doesn't show up in the app launcher, so there's no way for you to quickly launch it.
You'll need to go to the Android TV's Settings > Apps > See all apps, then scroll down to get to Photos and select Open on the right panel.
If you find yourself opening Photos frequently enough that these steps become annoying, or if you want to simplify it for a kid or someone else, you can set up a Button Mapper shortcut for it. Basically this remaps almost any button on the TV's remote to Photos.
Another solution would be to use a third-party launcher like Sideload Launcher or Home Screen Launcher to show your sideloaded apps and open them quickly.
Whatever the method you decide to access Photos with, the first time you open the app, it'll ask you for the permission to see your photos and media. You have to agree to that, then Photos' almost-familiar interface springs up.
The top bar lets you access your shared photos and conversations, as well as the various settings (more on that later). Below that, you'll find your memories followed by your gallery. As I mentioned earlier, the functionality here is very limited, so don't expect anything like Photos on your phone.
Step 3: Set up automatic screenshot backups
I already explained how to take a screenshot on Android TV in my remote remapping tutorial. Owners of the Nvidia Shield need not go through that, though. Holding down the Home button on the Shield's remote surfaces a menu for taking a screenshot.
Turn on automatic backups
When you first sign in with Google Photos, there's a good chance you'll be asked to turn on backup & sync. If you plan to use the Photos app to sync your screenshots, you need to turn that on, but it's not enough.
Most Android TV devices don't save screenshots inside the DCIM folder, so they won't be automatically part of the backup. You need to toggle sync for the standalone screenshot folder, but it isn't as easy as tapping on your avatar and going to settings to turn it on.
You'll quickly notice that D-pad scrolling in the menu isn't possible in Photos on Android TV, so you can't go down to settings or click on anything. What you need is a mouse or mouse-like functionality to do that.
Get a USB/BT mouse or a third-party app
Three scenarios present themselves in the case of the missing mouse function.
➡️ If you have a USB or Bluetooth mouse ready, just connect it to your Android TV unit. It's the easiest way to proceed.
➡️ If you have a Shield TV, you can download the official remote app from the Play Store and switch to the mousepad mode in it. You'll get a hovering mouse on your TV that you can move around and click on items with. Easy peasy.
➡️ And finally, if you have any other Android TV, you're left in the cold because the official remote app has a trackpad and a swipepad, but no mouse. I tried plenty of apps, but only one worked well on my Chromecast with Google TV: Zank Remote. I had to install it on both my phone and my TV to enable the cursor mode. The app requires accessibility access and the permission to display over other apps (it's putting a cursor on top of your screen). I also noticed that it kept asking for USB debugging and the permission to access media, but I got it to work without those.
Honestly, I'm not very comfortable recommending this because the app asks for more access than it needs. But if you don't have a Shield or a mouse, then it's the only thing that works. You can always revoke the permissions — and even uninstall the app — once you're done setting things up in Photos.
Enable screenshot backups (finally)
Whew, we're almost there.
Regardless of the way you got a cursor to show up on your TV, it's time to enable that screenshot folder backup. Go to your avatar on the top right of Google Photos. Now select Photos settings > Back up & sync > Back up device folders and toggle Screenshots on. All of the steps are outlined in the screenshots below.
And with that done, you can simply go back, disable the mouse and continue living your life normally. Each time you take a screenshot, it'll be automatically backed up to Google Photos, and it'll become accessible from all your devices. It works in the background too, just like Photos on any other Android device, but it may not be as instantaneous. Give it a few seconds if you don't see the images pop up on your phone.
I told you before we got started that this wasn't a simple process and I hope you realize why it's not worth it, given all the limitations you still end up facing once the app is installed. But if you often take screenshots on your TV and want to get them wirelessly over to your other devices, there's nothing as quick and reliable as Photos backups.