Photography has many enemies, but two of the biggest issues smartphones with their tiny sensors face are noise and blur. See, you can't just crank your smartphone's camera aperture wider in low-light or when moving. Outside a few exceptions, it's a fixed size. That means either a longer exposure or higher ISO to compensate — and that means blur and noise. We've all snagged disappointing shots at night because of it. But just a couple of months ago, Google Photos rolled out new tools meant to help combat both. Neither can magically make the issue go away, but the new denoise and sharpen tools work better than you think, and the "how" behind them is fascinating and entirely counter-intuitive.
The cause of blur is pretty straightforward: motion, either in your hand or in the scene beyond what your shutter speed is good for. But there is more than one potential source of noise. In addition to the noise introduced by the granular nature of light captured by the sensor, the process of reading and converting the captured data can introduce noise of its own.
Whatever the cause, we're all familiar with the effects: blurry oil-paint details on phones that over-process photos or speckled bits sprinkled all over.
Now, the simplest way to fix that problem (outside improving hardware) is in the phone's processing pipeline itself, but clearly not every manufacturer is up to the task, and there isn't much you can do about that once your photo is already taken. Or is there?
Google's always had pretty excellent computational photography chops — it's what's kept the Pixels at or near the top of the smartphone camera pile even as competitors have surpassed it by several generations in hardware. And two months ago, Google brought some of that know-how to bear in Google Photos. The new denoise and sharpen tools work in tandem to fight both noise and blur (as the names probably suggest).
From noisy to not
The denoise tool could be incredibly complicated to work the way it does, but Google figured out a sly new "pull-push" method to do something that should be really hard much faster and simpler. See, noise is irregular, but it's actually highly regular in its irregularity. I know that sounds weird, but the noise level for a given brightness at a set ISO generally matches in intensity across a photo. Bright spots are all about as noisy as one another; the same goes for dim. And that's something you can actually take advantage of when trying to compensate for it and process it out.
Darker areas in this example are noisier (and red in the map) bright areas are less noisy (and blue).
Because all spots that are about the same brightness should match when it comes to noise, you don't actually need to analyze the entire photo in so much detail to come up with a map to fight the noise. But that also adds a new issue of its own: now you need to process the entire image to compare brightness and structure for each and every spot to process that noise out. You've traded one problem for another, and the new one is almost as hard to do — or it would be, except Google came up with a shortcut: that push-pull processing we mentioned.
This will sound really odd, but the solution Google came up with essentially turns things into a blurry, low-res mess and then improves it from there. It's counterintuitive, but it's sort of like downsampling a really high-resolution image into a lower-resolution one to eliminate things like aliasing or blocky edges, though more guided. By combining pixels together selectively, merging spots that are similar to neighbors, you average things out in about the same way compared to processing every single spot looking for similar regions. But, this is way less computationally intensive.
Ta-da!
That's the "pull" part. Then you "push" back out, adding detail back in from a coarse blocky level to a fine one, essentially restoring the lost details while still "filtering" it through the more coarse averaging that removed the pixel-level noise based on similar areas.
The math behind it is more complicated than I'm making it sound here, but it's actually way easier to do than the other compare-a-bunch-of-points system. The difficulty scales linearly with image size/pixels, which is software-engineer speak for "not that hard." In fact, Google can do it on-device in mere milliseconds.
From noisier (left) to less noisy (right). It still has some of that over-processed vibe, but it's not as bad as other solutions.
Blur "kernels" — it's a thing
Google's strategy for reducing blur is kind of similar in the sense that it's wildly counter-intuitive and makes something that should be really hard much easier. You have to start with blur kernels.
See, every kind of blur comes down to a "kernel," which means a sort of blur shape. Think about it mechanically: If you're taking a photo of a single white dot and your arm moves, it ends up as a blurred shape, right? With a fast-enough exposure, it's usually a sort of line or fuzzy oval, but it's highly directional. If you can determine the level of blur, the direction, and the resulting blur shape — in other words, the blur kernel — then you can try to compensate for it and at least partly remove the effect.
Blur kernels aren't corn-shaped, but they cover a range of kernel-like shapes.
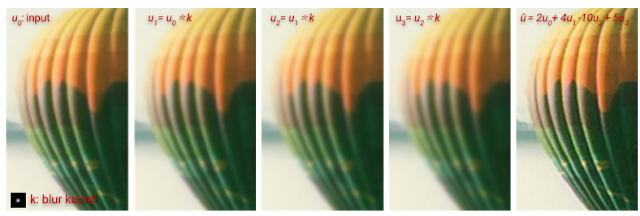
The thing is, there are a lot of these blur kernels to compare against when you're trying to reverse-engineer the one you've got at work in an image. And whenever you have a whole big thing you're comparing with a whole lot of other things, you run into that "computationally intensive" wall again that makes it hard to do. It's exponentially more difficult depending on the strength of the blur, too — that's software engineer speak for impractical. But, as always, some Googlers came up with a wildly ridiculous method of making a hard problem easy in a way that sounds like it should make it worse: They make the image blurrier.
First, you generally estimate the blur present in the original image using a gradient wherever you can see one. An edge that should be high contrast will generate this sort of gradient, and it's not too hard to computationally detect and measure. The direction and strength of that gradient give you an idea of the original blur strength (and that blur kernel). Now that you know precisely the shape and strength of the blur, you crank it up to 11 and reduce it with some math.

It's a system called "polyblur," and as the name suggests, it means blurring an already blurry image recursively several times with the detected blur kernel. But there's a key difference in that these new, increasingly blurry images are helpful as a source of data. The system combines and then adds and subtracts the various blurred versions together at different strengths with the original based on some fancy math Google devised, and voila! Now, the numbers behind this are a little (read: a lot) more complicated than that, but that's the not-a-mathematician version for how it works.
These examples of Polyblur compared to other systems are pretty amazing.
Lastly, and best of all, this is again simple enough to do on-device in a fraction of a second as you haphazardly fling a slider in Google Photos way too far. It's a little bit of mathematical magic and Google makes it seem trivial while also not making the results quite as muddy or as some other systems.
The next time you fire up Google Photos, play around with the new sharpen and denoise sliders. Now that you know how they work, the counter-intuitive logic behind them, and the clever tricks that went into making them work quickly and easily on-device, we promise it will seem at least a little bit cooler.
Update: An earlier version of this story claimed denoise and sharpen were Google One-exclusive features, which isn't correct. Our coverage has been updated.