Laptops are in short supply globally—especially cheap ones like Chromebooks. But if you have an older Windows 7, 8, or even Vista laptop sitting in a closet somewhere at home, it's possible you can convert it into a secure and relatively performant Chrome OS device with the use of a totally free tool. The benefits are obvious: your old laptop gets a new lease on life, and you don't spend any money. As long your laptop still basically works, it's entirely possible you can be up and running with Chrome OS using just a USB stick and the relatively simple instructions below in minutes.
While Google officially supports only devices that are custom-built to fit Chrome OS, thanks to Neverware's CloudReady fork of Chromium OS, almost any x86 Windows or Mac OS laptop can become a Chromebook, plus: it's totally free. We'll show you how to get set up.
CloudReady officially certifies only a few models that you can find on Neverware's website. Still, the company says that it should work on most laptops, though "uncertified models may have unstable behavior, and our support team cannot assist you with troubleshooting." It's still worth a try since you can give the OS a test run from a USB drive before installing.
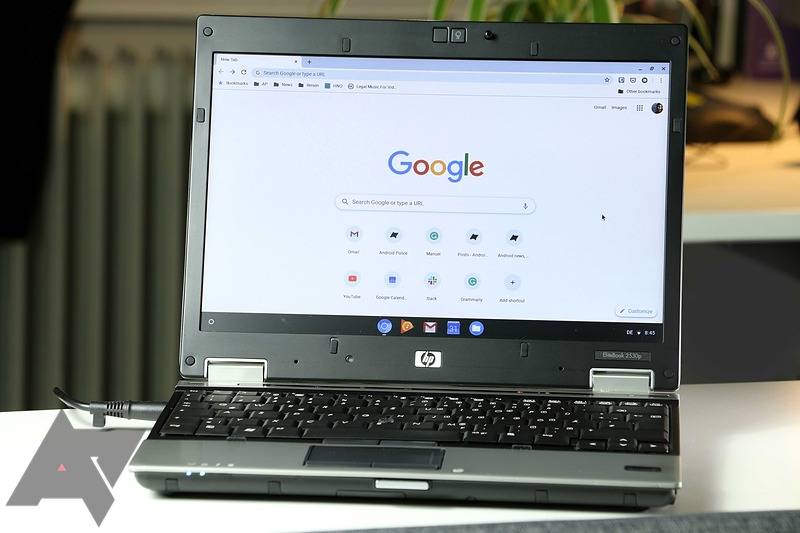
I chose a 2008 HP EliteBook 2530p to test this myself. It's a 12-inch Core 2 Duo laptop with 2GB of RAM and a 250GB HDD, so you can imagine that Windows is unusable on it these days. It's one of the certified Neverware models, so the company tells us exactly what works and what doesn't on the hardware. It warns me that I need to enable UEFI in my BIOS settings before attempting the installation and that the laptop's dedicated Wi-Fi and mute buttons won't work, so it encourages me to use the on-screen alternatives for that. Considering this computer is more than 12 years old and was never meant to run Chrome OS, that's a pretty small list of problems.
CloudReady vs. Chrome OS
Compared to the regular Chrome OS, this Chromium OS build has a few missing features. It doesn't support Google Assistant at all and you don't have access to the Play Store or any Android apps. The same is true for Linux applications. You also can't connect your Android phone to the OS. Geolocation and timezone info can't be accessed by CloudReady, so you can't use location-based applications and need to change time zones while traveling manually. More advanced features like Power Wash and Device Data Wipe are also missing to preserve Neverware's Chromium OS customization. Num Lock switchers aren't supported on any laptop, either.
Since Neverware hast to adjust its tweaks with each new Chromium OS update, CloudReady is always about a version behind the latest stable release of Chrome OS, and you can't use any of the beta, dev, or Canary versions of the OS.
When I set up the device in US English, I also encountered the problem that CloudReady thought my German keyboard had an English layout (which is particularly annoying while entering passwords), which I could only fix after I'd fully installed the system. This seems like an edge case, though — most people will probably use their laptops in the language its keyboard shipped with. Guest Mode generally exclusively works with a US English keyboard layout, though, so be warned when you give away your laptop and you have a different keyboard layout.
To see Adobe Flash content or watch protected media like Netflix films, you first need to activate the corresponding plugins in Settings -> Media Plugins — proprietary software like these doesn't come with the open-source Chromium OS base.
Other Chromium OS solutions
Of course, instead of going for CloudReady, you could also install Chromium OS right away without relying on a for-profit company at all. If you go this route, you won't have access to Flash and DRM-protected content, but in contrast to CloudReady, you can install Chromium OS on ARM devices. Older laptops rarely run on ARM chips, though, so this might be of little tangible advantage here.
There's also FydeOS (based on Flint OS, which has been bought by Neverware). It recreates more Chrome OS functions like Linux and Android app support and even works on Raspberry Pi units. However, this fork isn't as well documented for laymen as CloudReady, and it doesn't offer a selection of certified models that are guaranteed to work with limited issues only. While you might be happier with FydeOS in the long run thanks to its more advanced features, CloudReady is great if you want to dip your toes into the world of Chromium/Chrome OS. (Also, Neverware is a US company while FydeOS is Chinese, if that's important to you.)
Installing CloudReady
If your model isn't on the list of supported devices, make yourself familiar with the critical requirements stated on Neverware's website. It says you'll need a PC or Mac from 2007 or later and at least 2GB of RAM. For installation, you should also have a USB drive with 8 or more GB of storage at hand.
- RAM: 2GB or greater
- Storage space: 16GB or more
- BIOS: Full administrative access, in order to boot from the CloudReady USB installer
- Processor and Graphics: Components made prior to 2007 will likely result in a poor experience. Additionally, the following graphics hardware does not meet performance standards on CloudReady: Intel GMA 500, 600, 3600, 3650
Create the USB stick installer
If you're a Windows person, you can use CloudReady's automated USB installer tool, which is a little involved process well described by the on-screen instructions.

On Mac and Chrome OS, the path to Cloudready is a little more complicated. First, download the CloudReady Home Edition image. While that's in progress, you can add the Chromebook Recovery Utility to your Chrome browser, which you will need to create the stick. Launch the utility and click the gear icon in the top right corner and choose Use local image. Once you've finished downloading the image file, select it in the installer, and the program will start creating the recovery media.
Installation and setup
Now that you've got your USB tool, you can plug it into the machine you want to turn into a Chromebook while it's turned off. To install the OS, you need to boot your laptop from that USB stick, which means you'll have to enter the BIOS and change the boot sequence. Depending on your brand, you might be able to rely on the list below. For others, you'll need to search Google for instructions on how to change the boot order.
|
Dell |
Tap F12 when the Dell logo is displayed. |
|
HP |
Tap F9 when the HP logo is displayed. |
|
Lenovo |
Tap F12 when the Lenovo logo is displayed. |
|
Apple |
Hold Option (next to the ⌘ key) when the computer first turns on. |
|
Toshiba |
Tap F12 or F2 when the Toshiba logo appears. |
|
Acer |
Tap F12 as the Acer logo appears. |
|
Other |
Try tapping Esc, F1-12, or Enter during bootup. |
Once you've entered the screen with boot options, you'll have to choose the one that represents your USB tool. It should be named "USB device," "USB storage," or something else that makes sense (it won't be your hard drive or your CD/DVD reader). If you select the correct one, you should see a bright, white screen with the CloudReady logo on it.
You can set up your Google account and start testing the Chrome OS environment then and there. Your experience while testing it will likely be much slower than what you can expect once you've installed the OS, but make sure everything works before you do that. Check if all your connections like Wi-Fi, Ethernet, USB, and Bluetooth are functional, and make yourself familiar with Chrome OS' keyboard shortcuts. Ensure your touchpad works as expected, and see if your webcam and speakers function properly. If you have a touchscreen, see if you can use it with the OS.
Once you're 100 percent sure you want to turn your machine into a Chromebook and know about potential issues, click the notification/clock pill in the bottom right corner and select Install OS. You'll have to go through an end-user agreement with Neverware, but once that's done, the USB drive will begin formatting your hard drive and install Chromium OS. Note that you will lose your previously installed OS and any files on it in the process.

On your fresh install, you'll have to sign in to your Google account again. Since Chrome OS is mostly cloud-based, you won't have to fully set up everything one more time, though — most of your settings should be downloaded automatically from Google's servers. If you've already activated Flash and proprietary media on your USB drive install, you'll have to toggle those on once more, though. After that, you're all set to start playing with your brand-new Chrome OS machine. The lightweight system should breathe new life into whatever aging device you call your own.
If you run into any issues during any part of the install process, check out Neverware's excellent detailed guide — it stretches across multiple pages and also accommodates more outlandish scenarios.
Using CloudReady
Considering my HP EliteBook only has 2GB of RAM and a Core 2 Duo processor, I'm astounded how well it runs. As long as I limit myself to a maximum of about five tabs or windows at a time and try not to leave Gmail open all day, I'm almost inclined to believe I'm using some modern entry-level Chromebook. I haven't missed the Assistant one bit, and while the lack of Android apps is a minor annoyance, I don't think my EliteBook could realistically keep up with the necessary virtualization anyway.
In fact, I've entirely written and researched this guide on the trusty old HP laptop, though I wouldn't use it for my job in the long run — simply leaving Gmail, Slack, and WordPress open at the same time leads to noticeable slowdowns. Depending on your laptop, you might get much more performance out of it, though, and as a secondary device for casual document editing, Amazon shopping, video streaming, Gmail checking, or Reddit browsing, any old laptop on Chrome OS should do fine.

For a 2GB machine, Slack, Gmail, and WordPress might be too much to handle at once when you want to open more tabs in addition to them.
If you consider upgrading your old machine's hardware after turning it into a Chromebook, I can only recommend to check out used, proper Chromebooks before. Depending on how much you're willing to invest in your current hardware, a second-hand alternative might be the better and more stable deal as you may get access to the regular Chrome OS experience complete with Google Assistant, Android apps, and Linux virtualization (check their update expiration date beforehand, though!).